
Framed!

To remember my father, I wanted to preserve a picture of him in a special picture frame. Purchasing a mass produced frame was not going to do him justice. So began my fun journey into making unique fused glass picture frames. In fact, I had so much fun and bursts of creativity that I made a number of frames over a 2 week period. Some of these have already been given as gifts, sold on my Etsy site, and preserved for my own use. I want to share my technique and a few of my pieces here.
First decision – what size picture are you framing? Most of my frames are designed for 4″x6″ pictures but I could just fit a frame for an 8″x10″ into my kiln.
Second decision – what basic color do you want your frame to be? Choose opaque glass for the base frame since you will be gluing a traditional frame on the back.
Now, time to start cutting the glass. Use of a ruler is a must since you’ll want everything to actually fit together well. For a 4″x6″ frame, you will need: 4 rectangles 5″x 1.5″ and 4 rectangles 6.5″x1.5″ For an 8″x10″ frame, go with 4 10″x1.75″ and 4 12″x1.75″ rectangles. If you’re doing your math and laying this out you might be wondering why so many pieces. The secret is you need to double up the glass when fusing to get it thick enough and allow any seams to be fused away.
Lay the first layer out like so:

Then lay out the second layer but stagger the pieces differently so the seams on the top and bottom layer don’t line up. This will allow all the pieces to fuse together into a single frame of glass. Here is what a basic frame looks like after a standard full fuse (to 1460 F for 3 min).

Pretty boring yes? But it’s a great starting platform for decoration and additional fusing.
It is also possible to add more features during the initial frame fusing step. In this example, I laid out the white frame pieces and then placed millefiori dots in a random pattern on top.
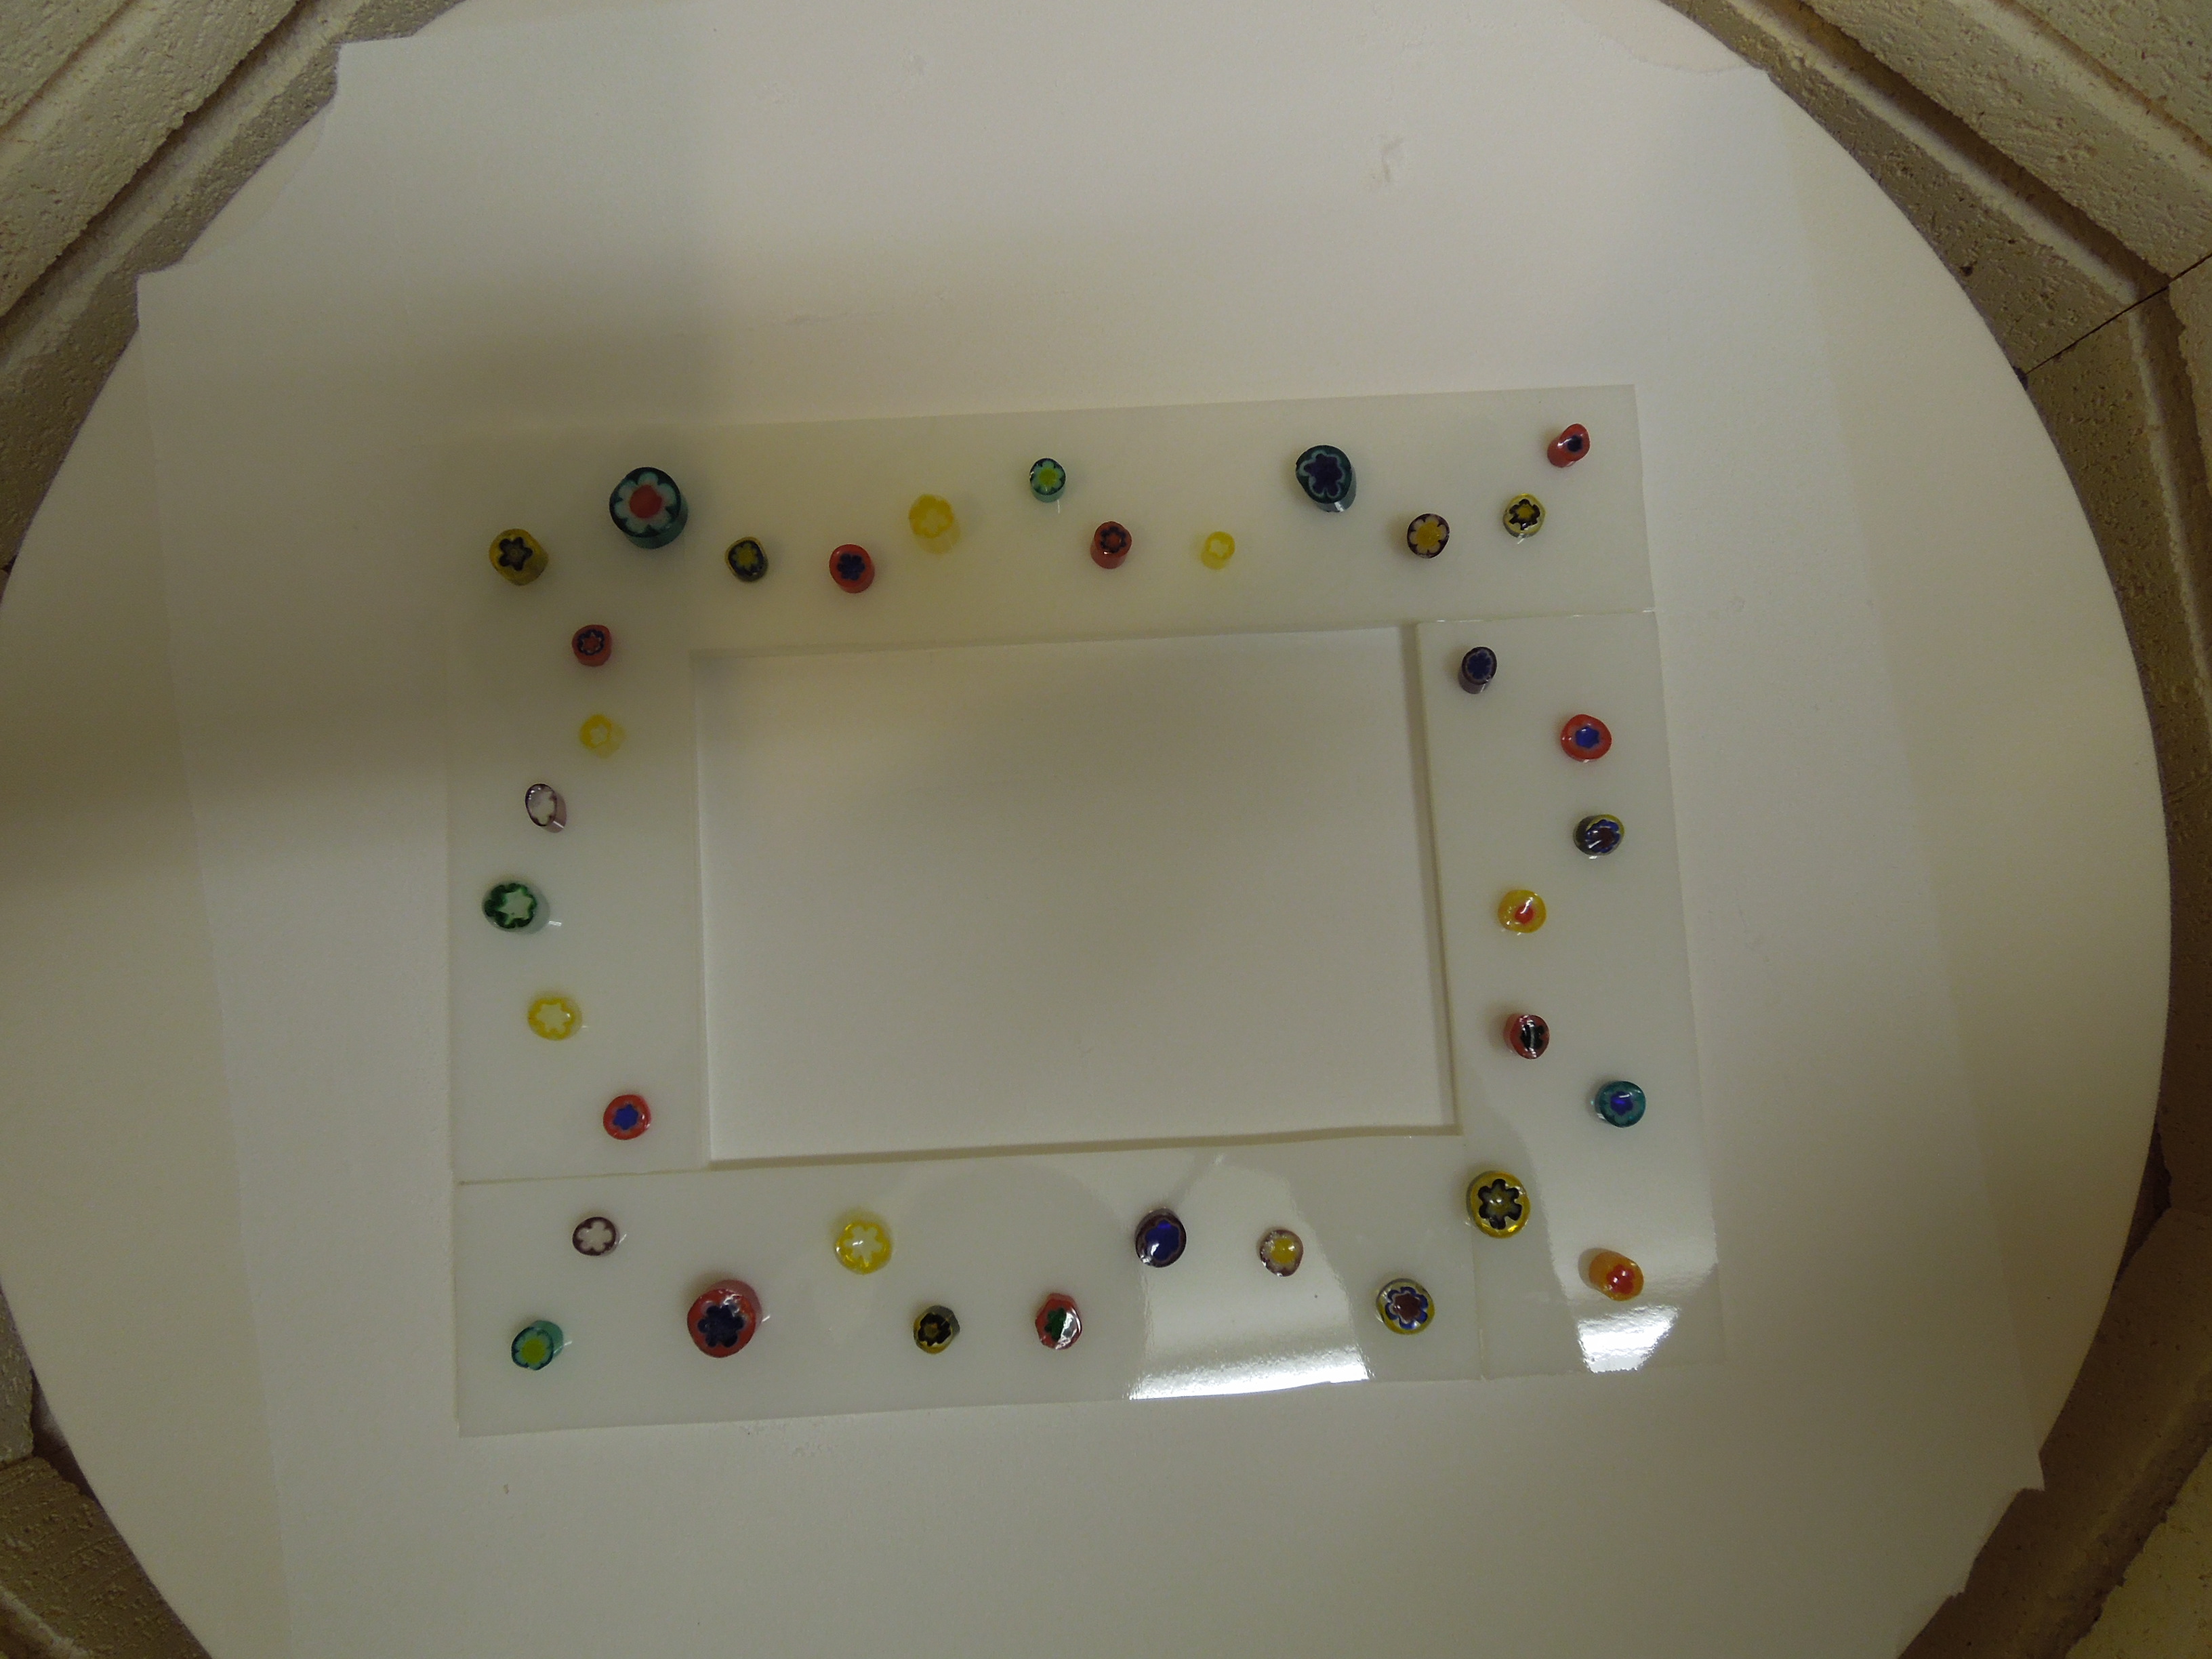
Here’s the final result:

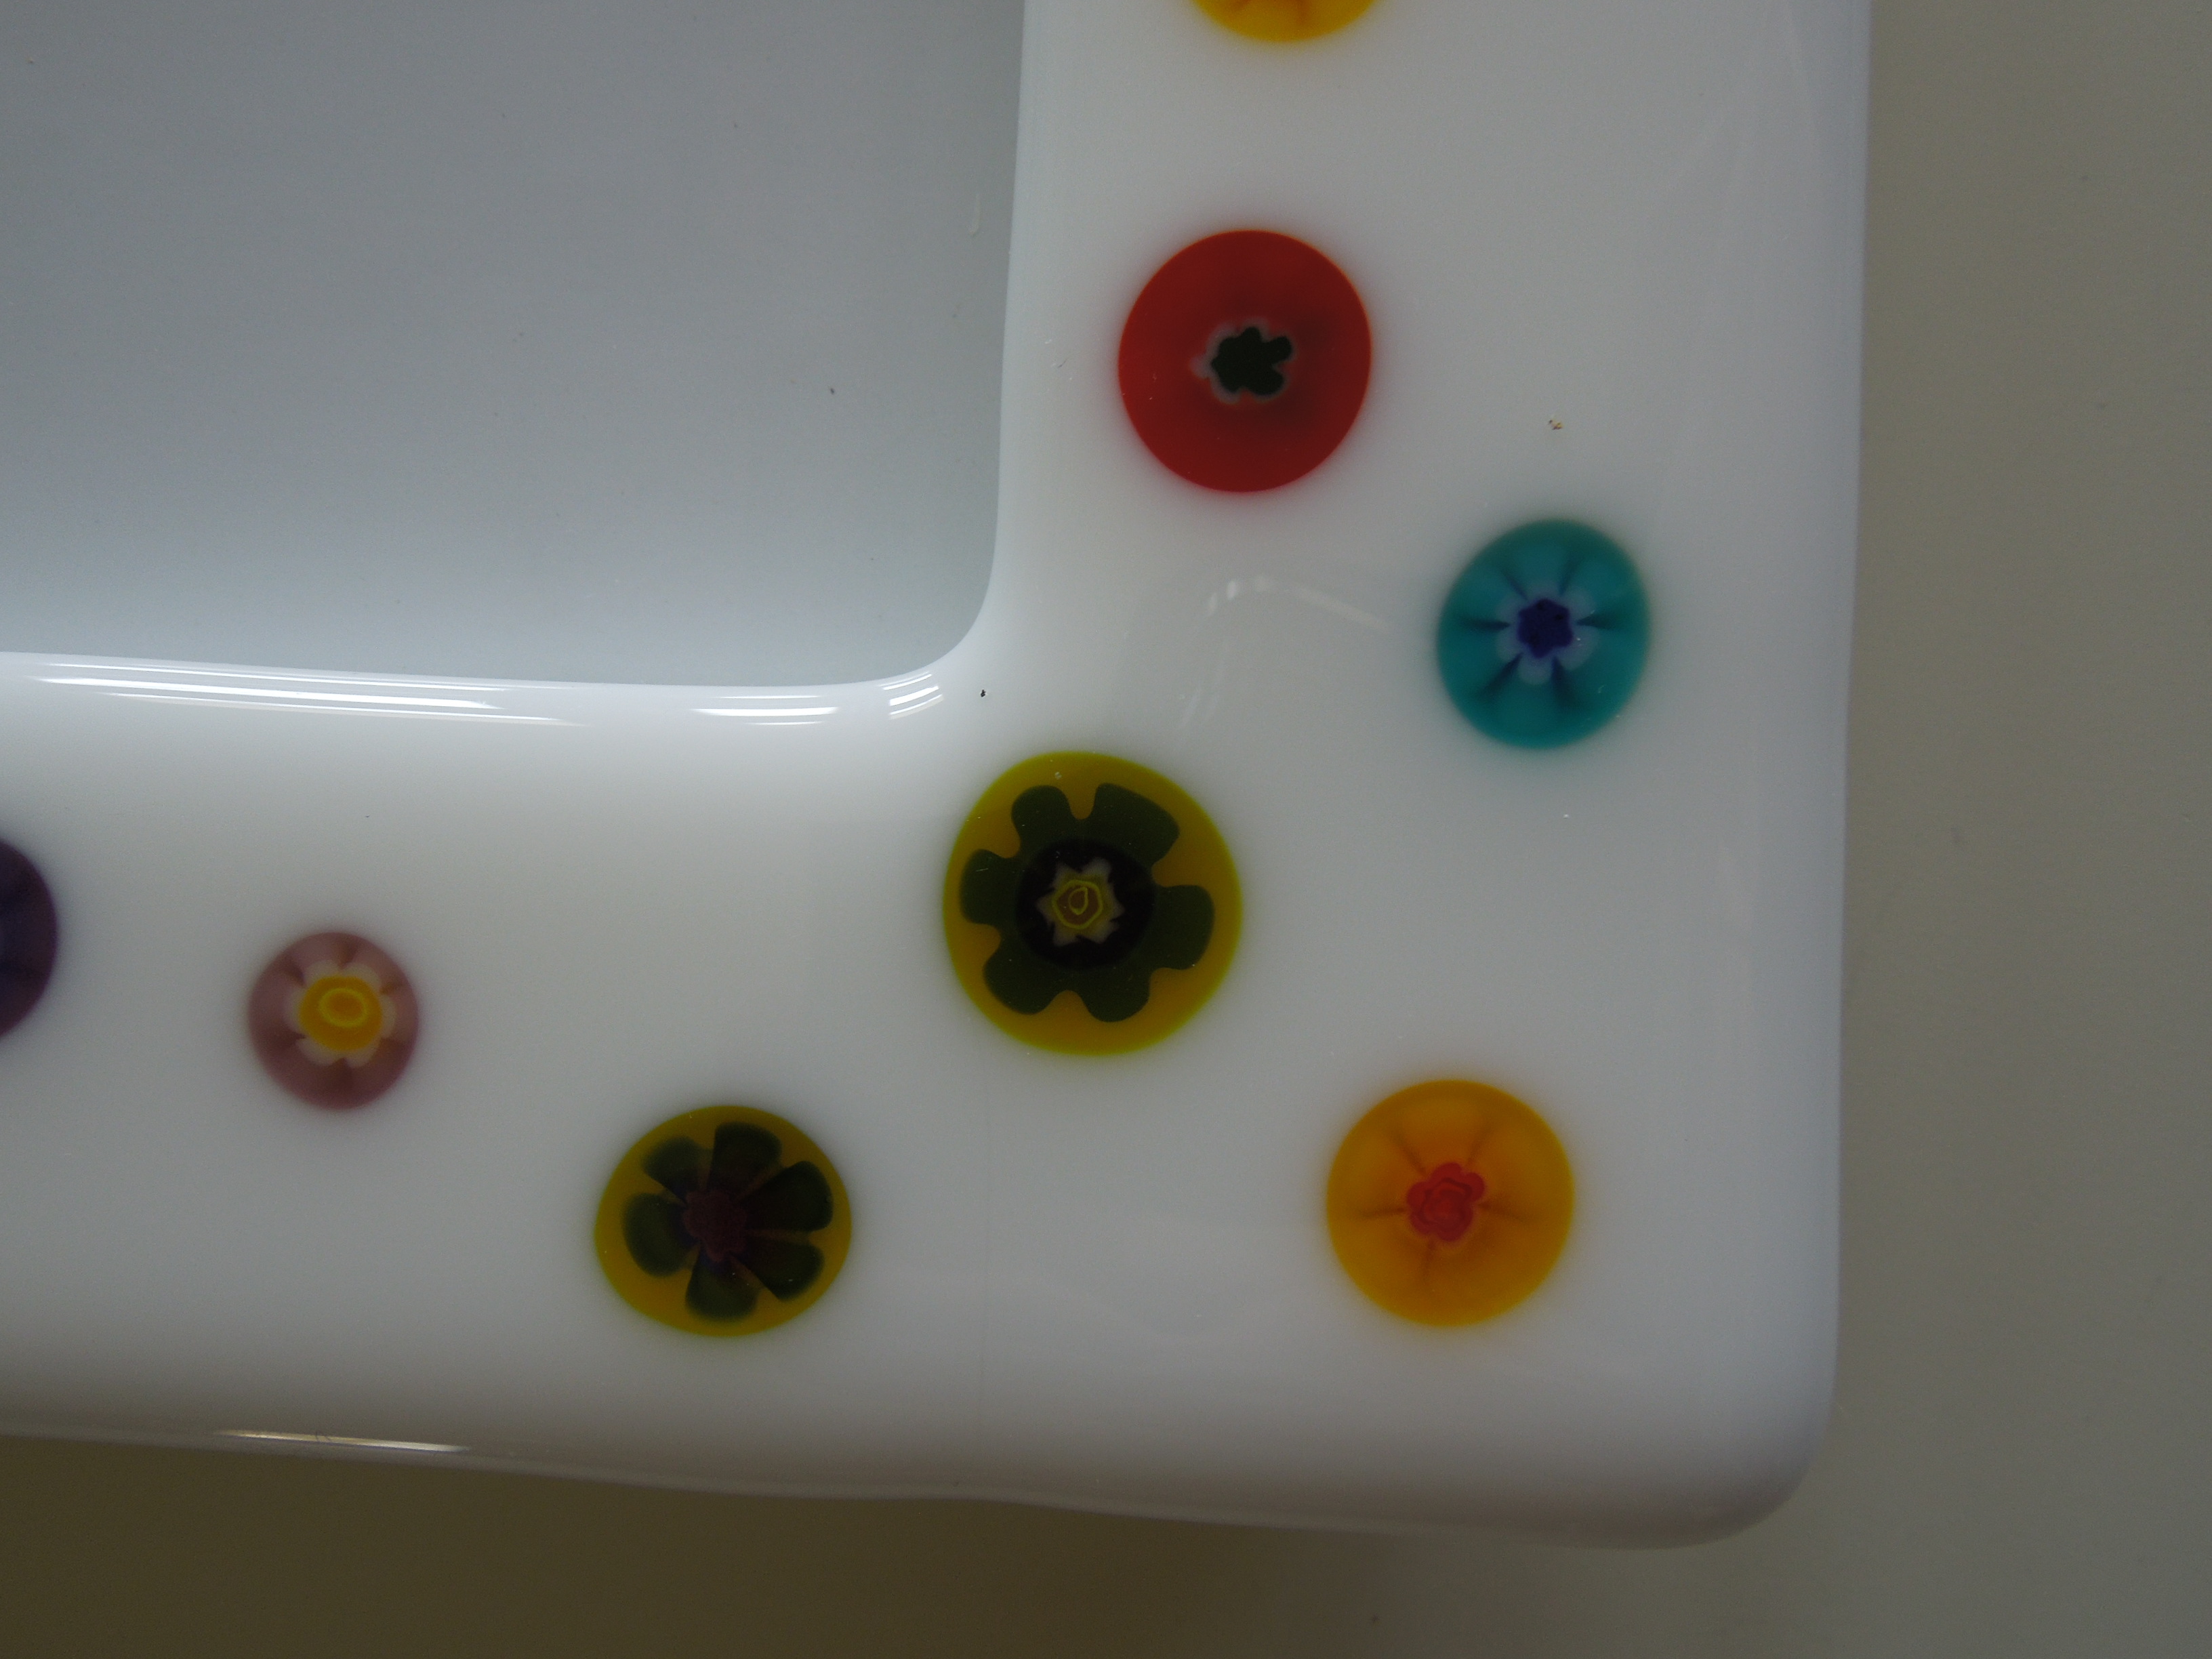
The millefiori completely fused into the white frame creating this fun and whimsical frame. To complete it, glue a basic frame onto the back. I buy cheap frames on sale from Michael’s and use E600 glue to bond the frame to the glass.
Now I’m having fun!
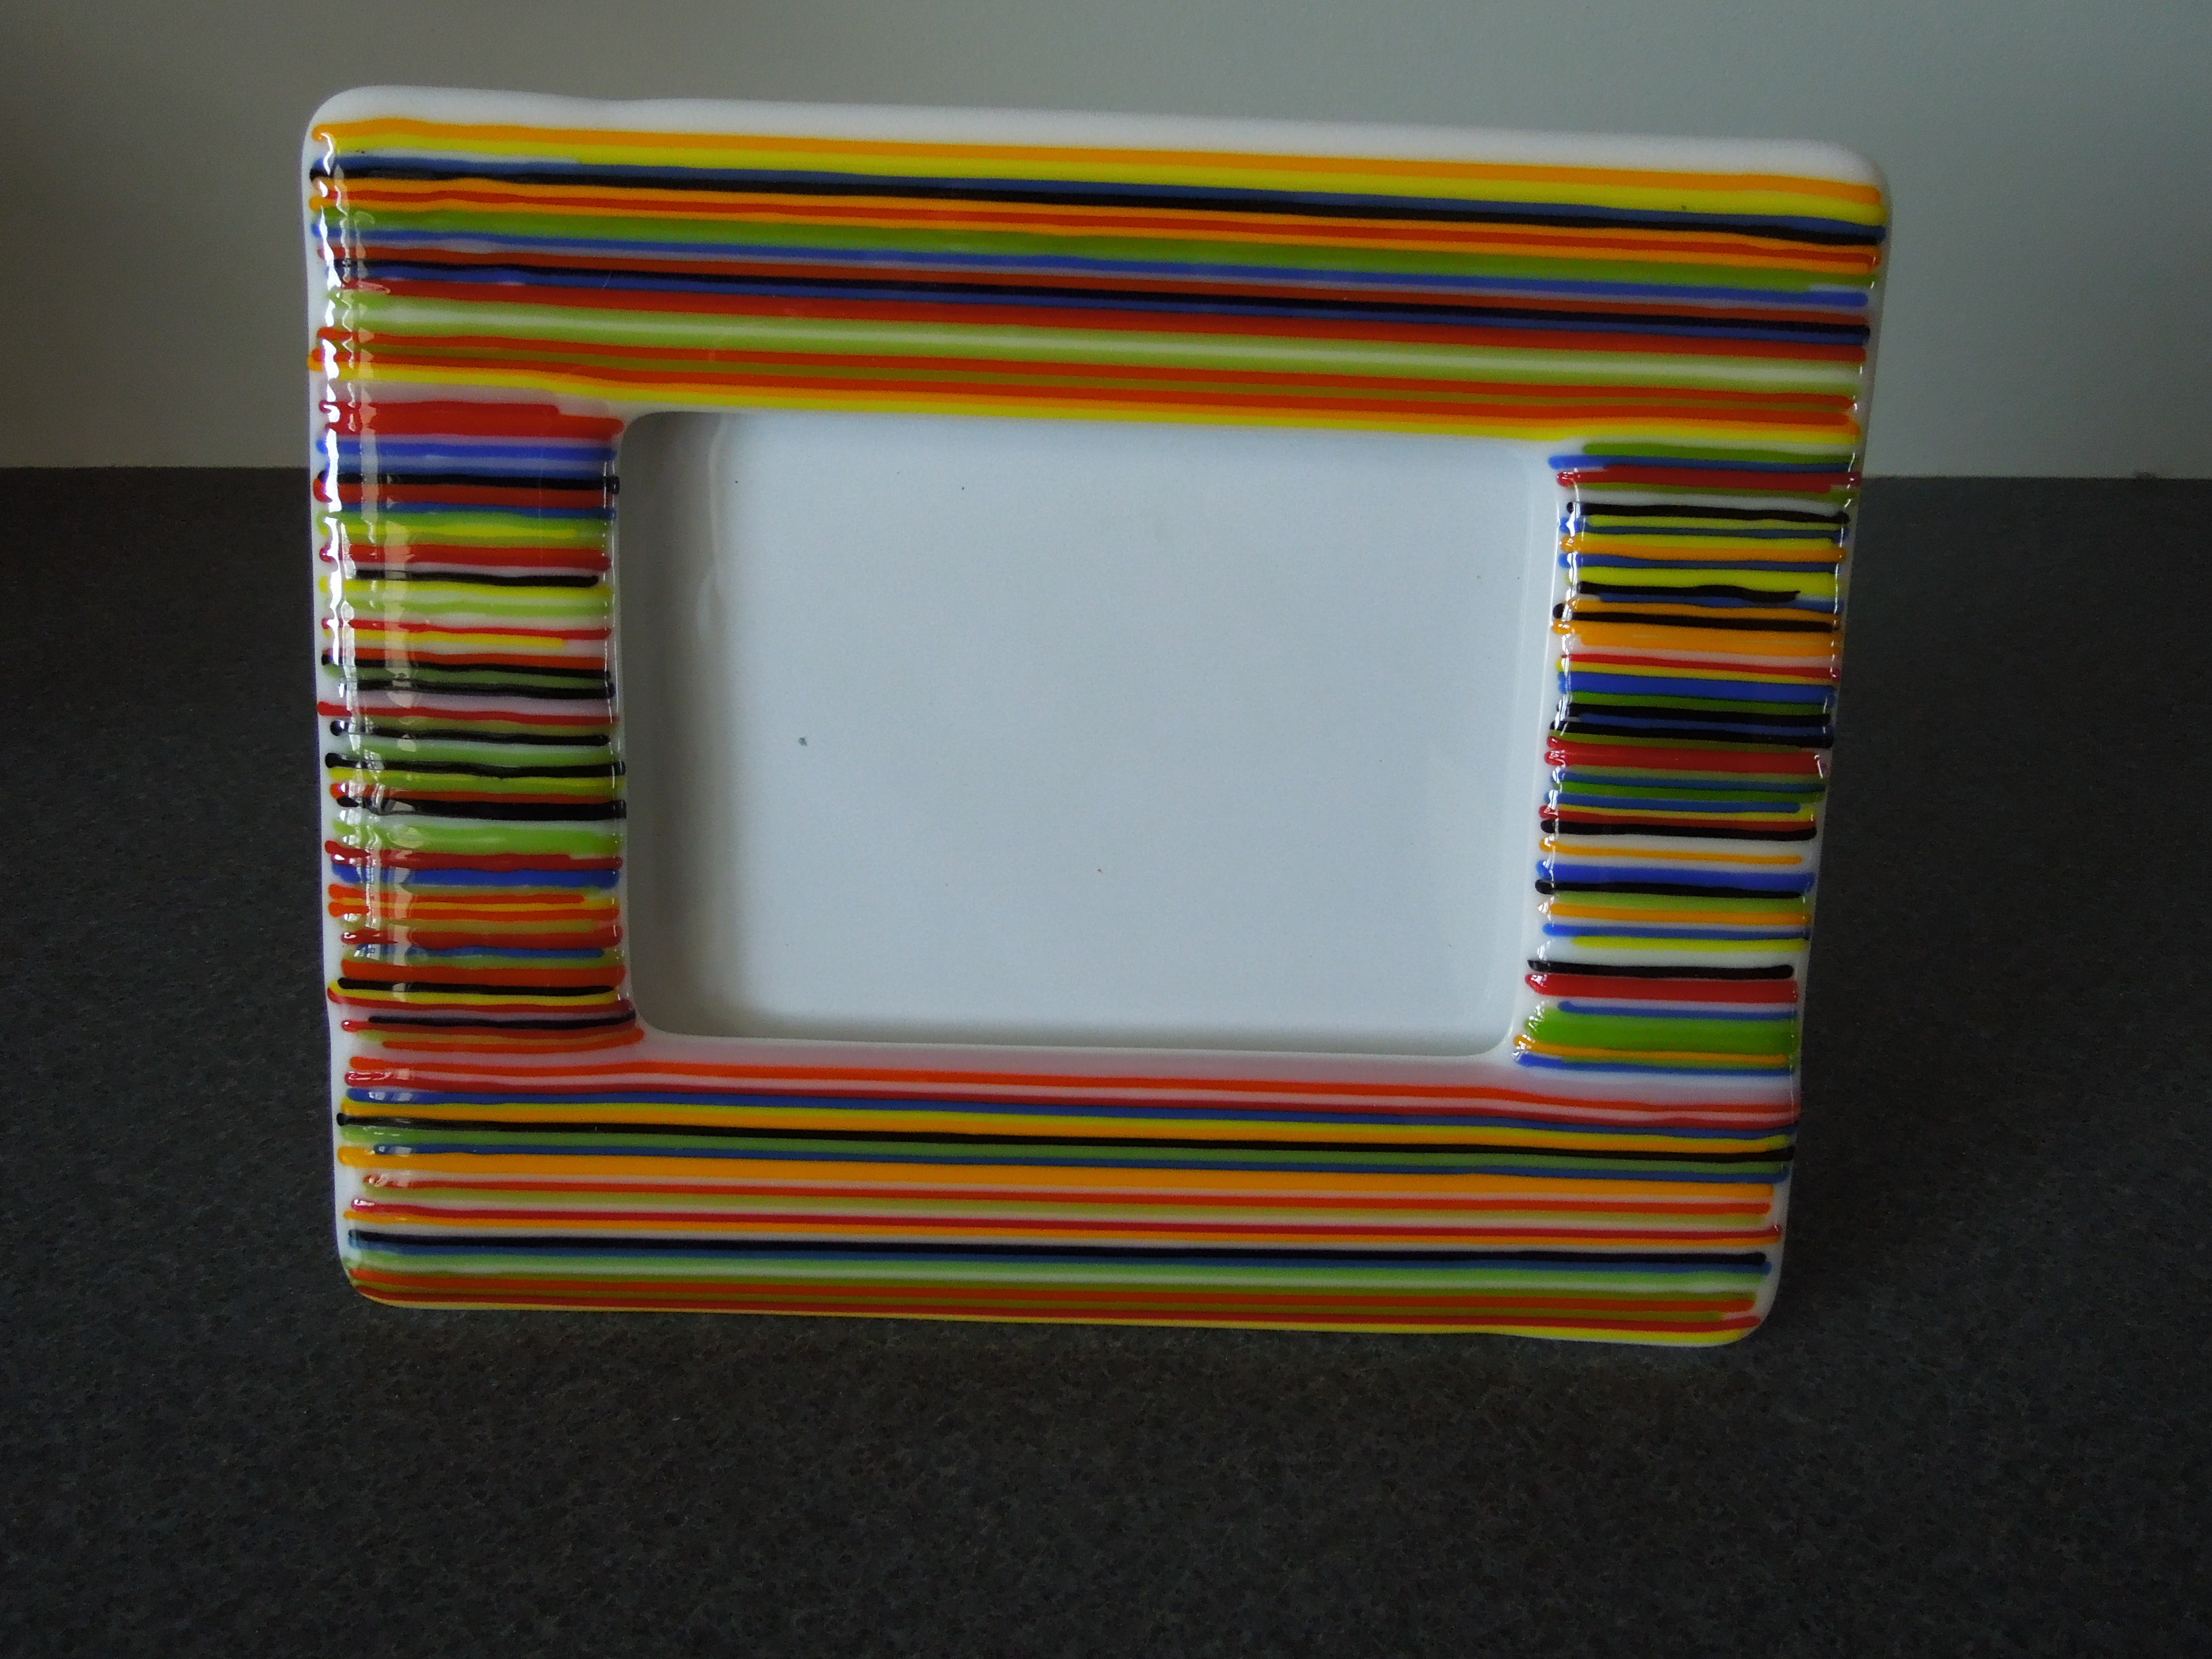
Next project took the basic white fused glass frame and aligned multi-color stringers of glass across it. Note that I use a little elmer’s glue to tack the glass rods in place. A full fuse (the second fuse of the project) melded all the lines into stripes.

When adding decorative pieces of glass to the base frame, you do not have to do a full fuse. Tack fusing (don’t ramp to such a high temp – go to ~1375 F) will add topography to highlight the decorations.
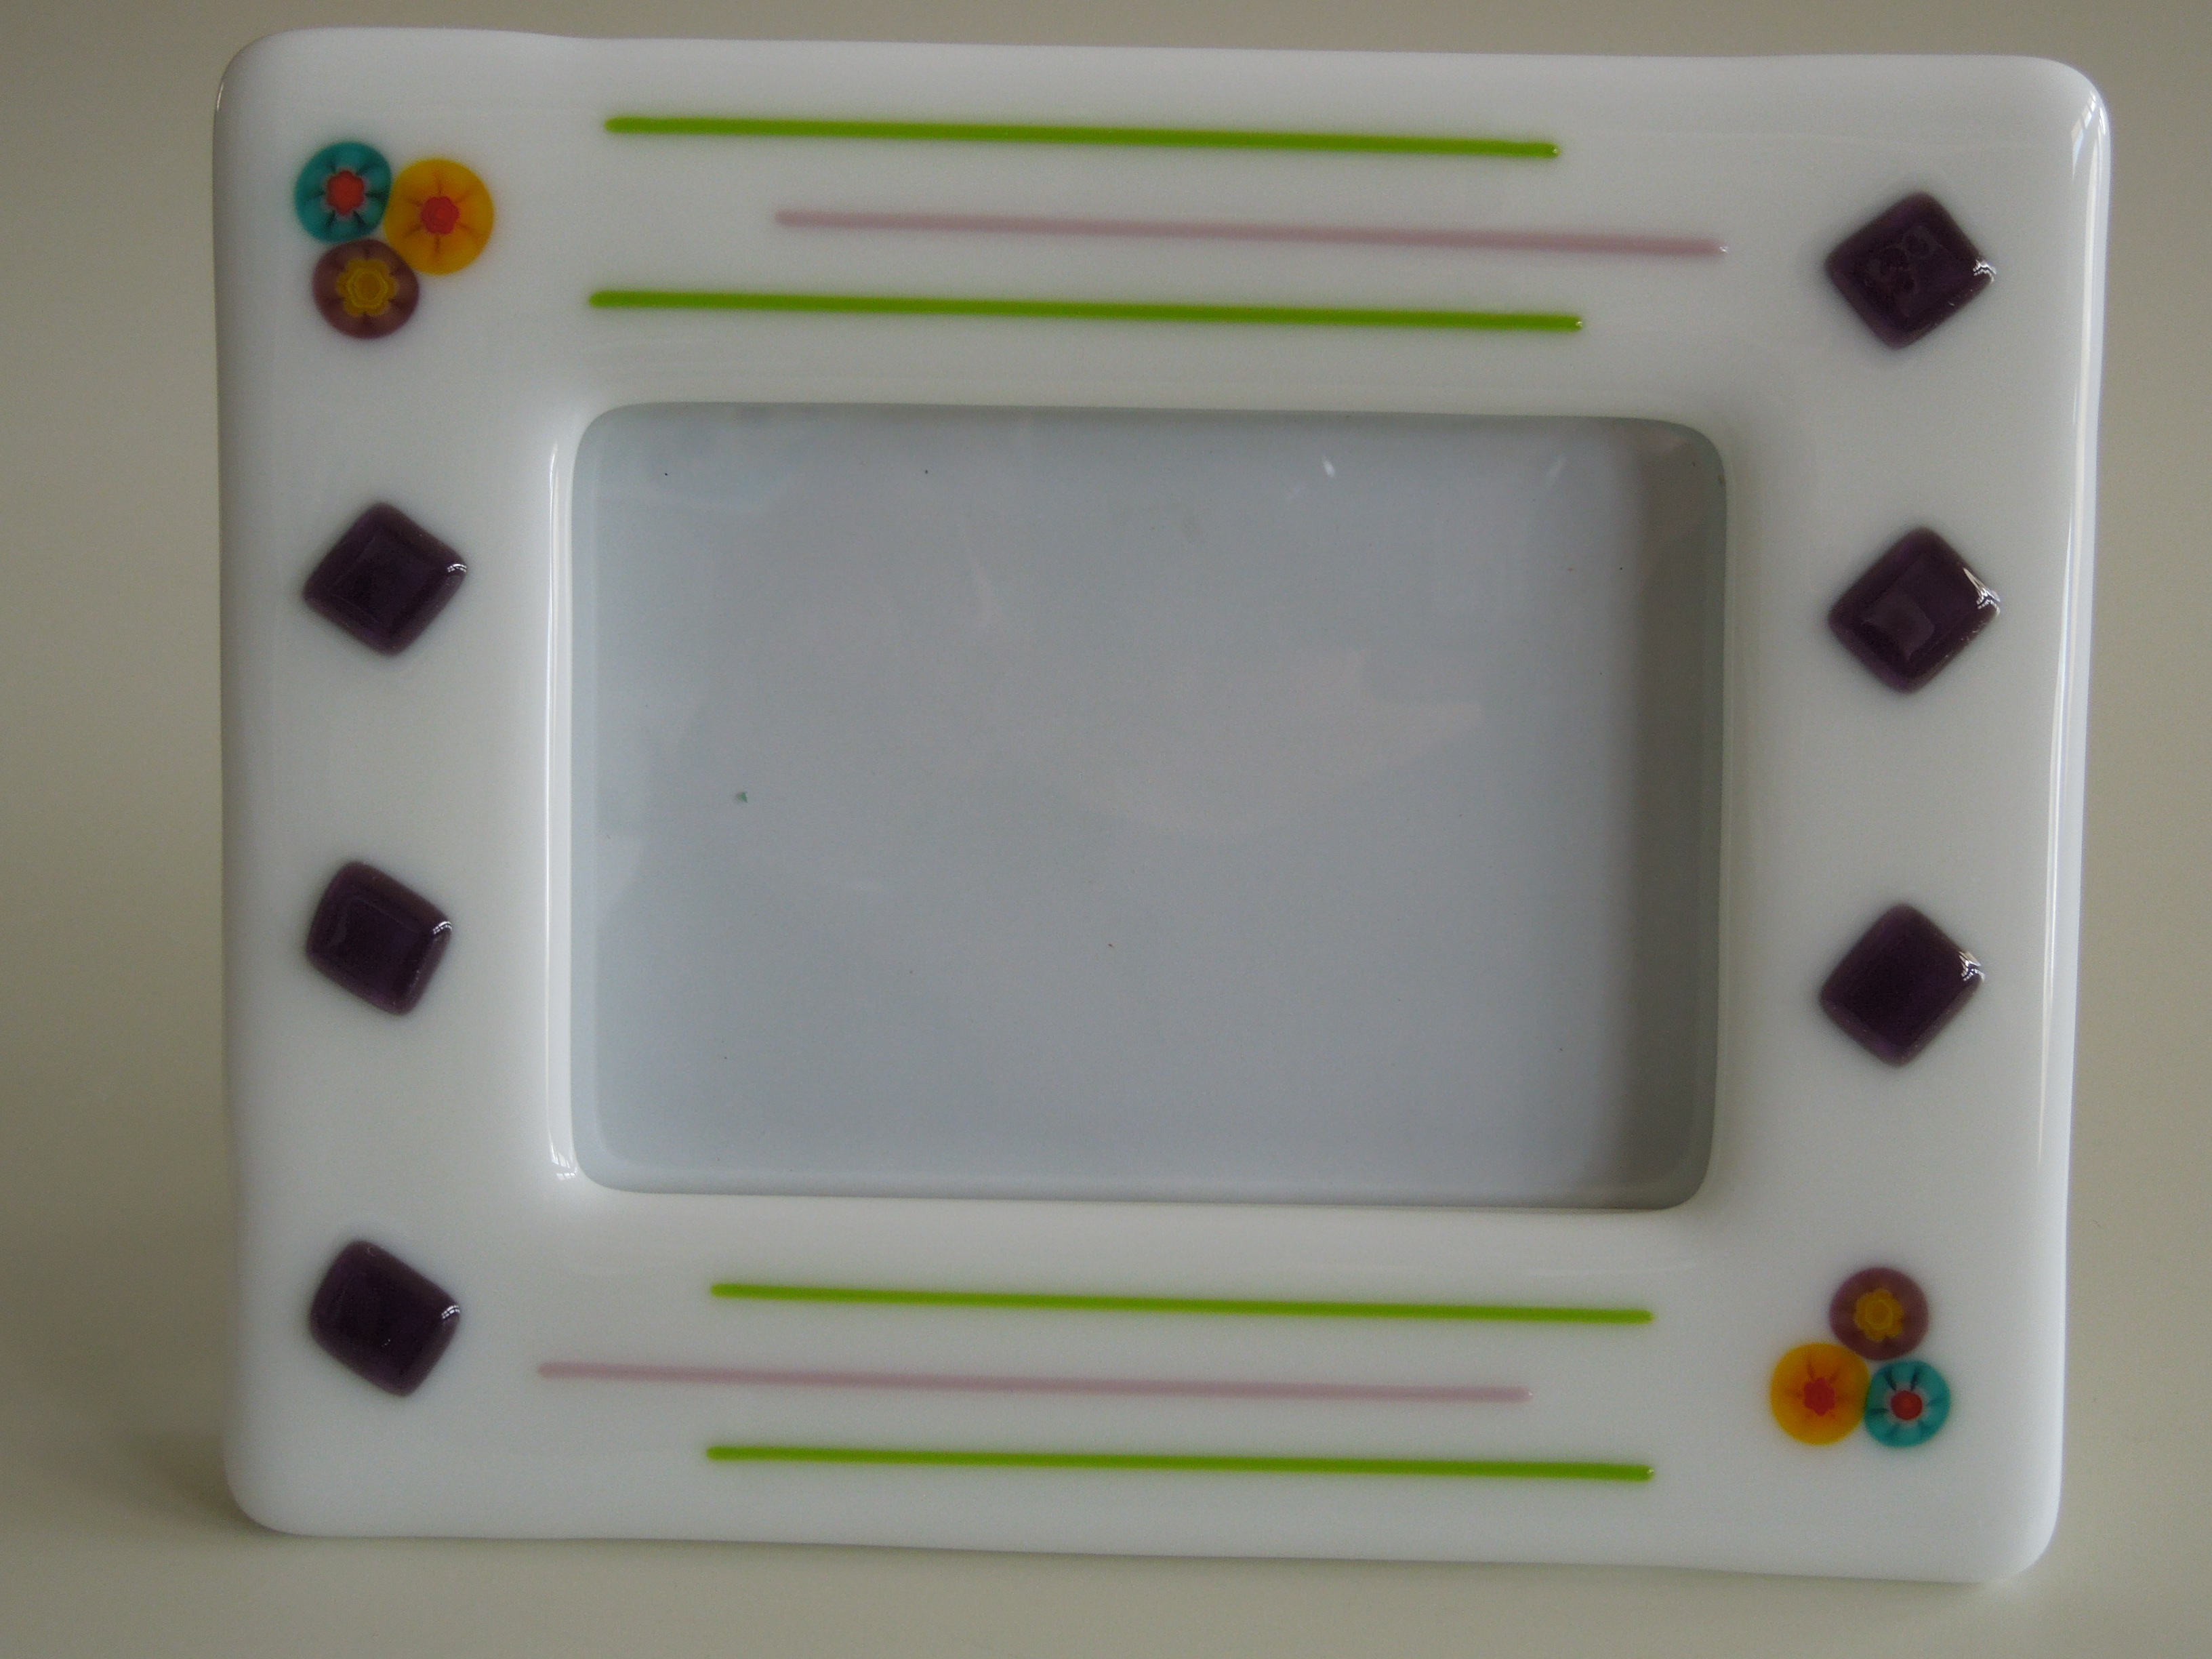
In this next example, I created the white frame and millefiori trios during a full fuse. Then, I followed up by tack fusing some green and pink stringers along with blue diamonds.
Are you starting to get the sense that the sky’s the limit for embellishing the frames?
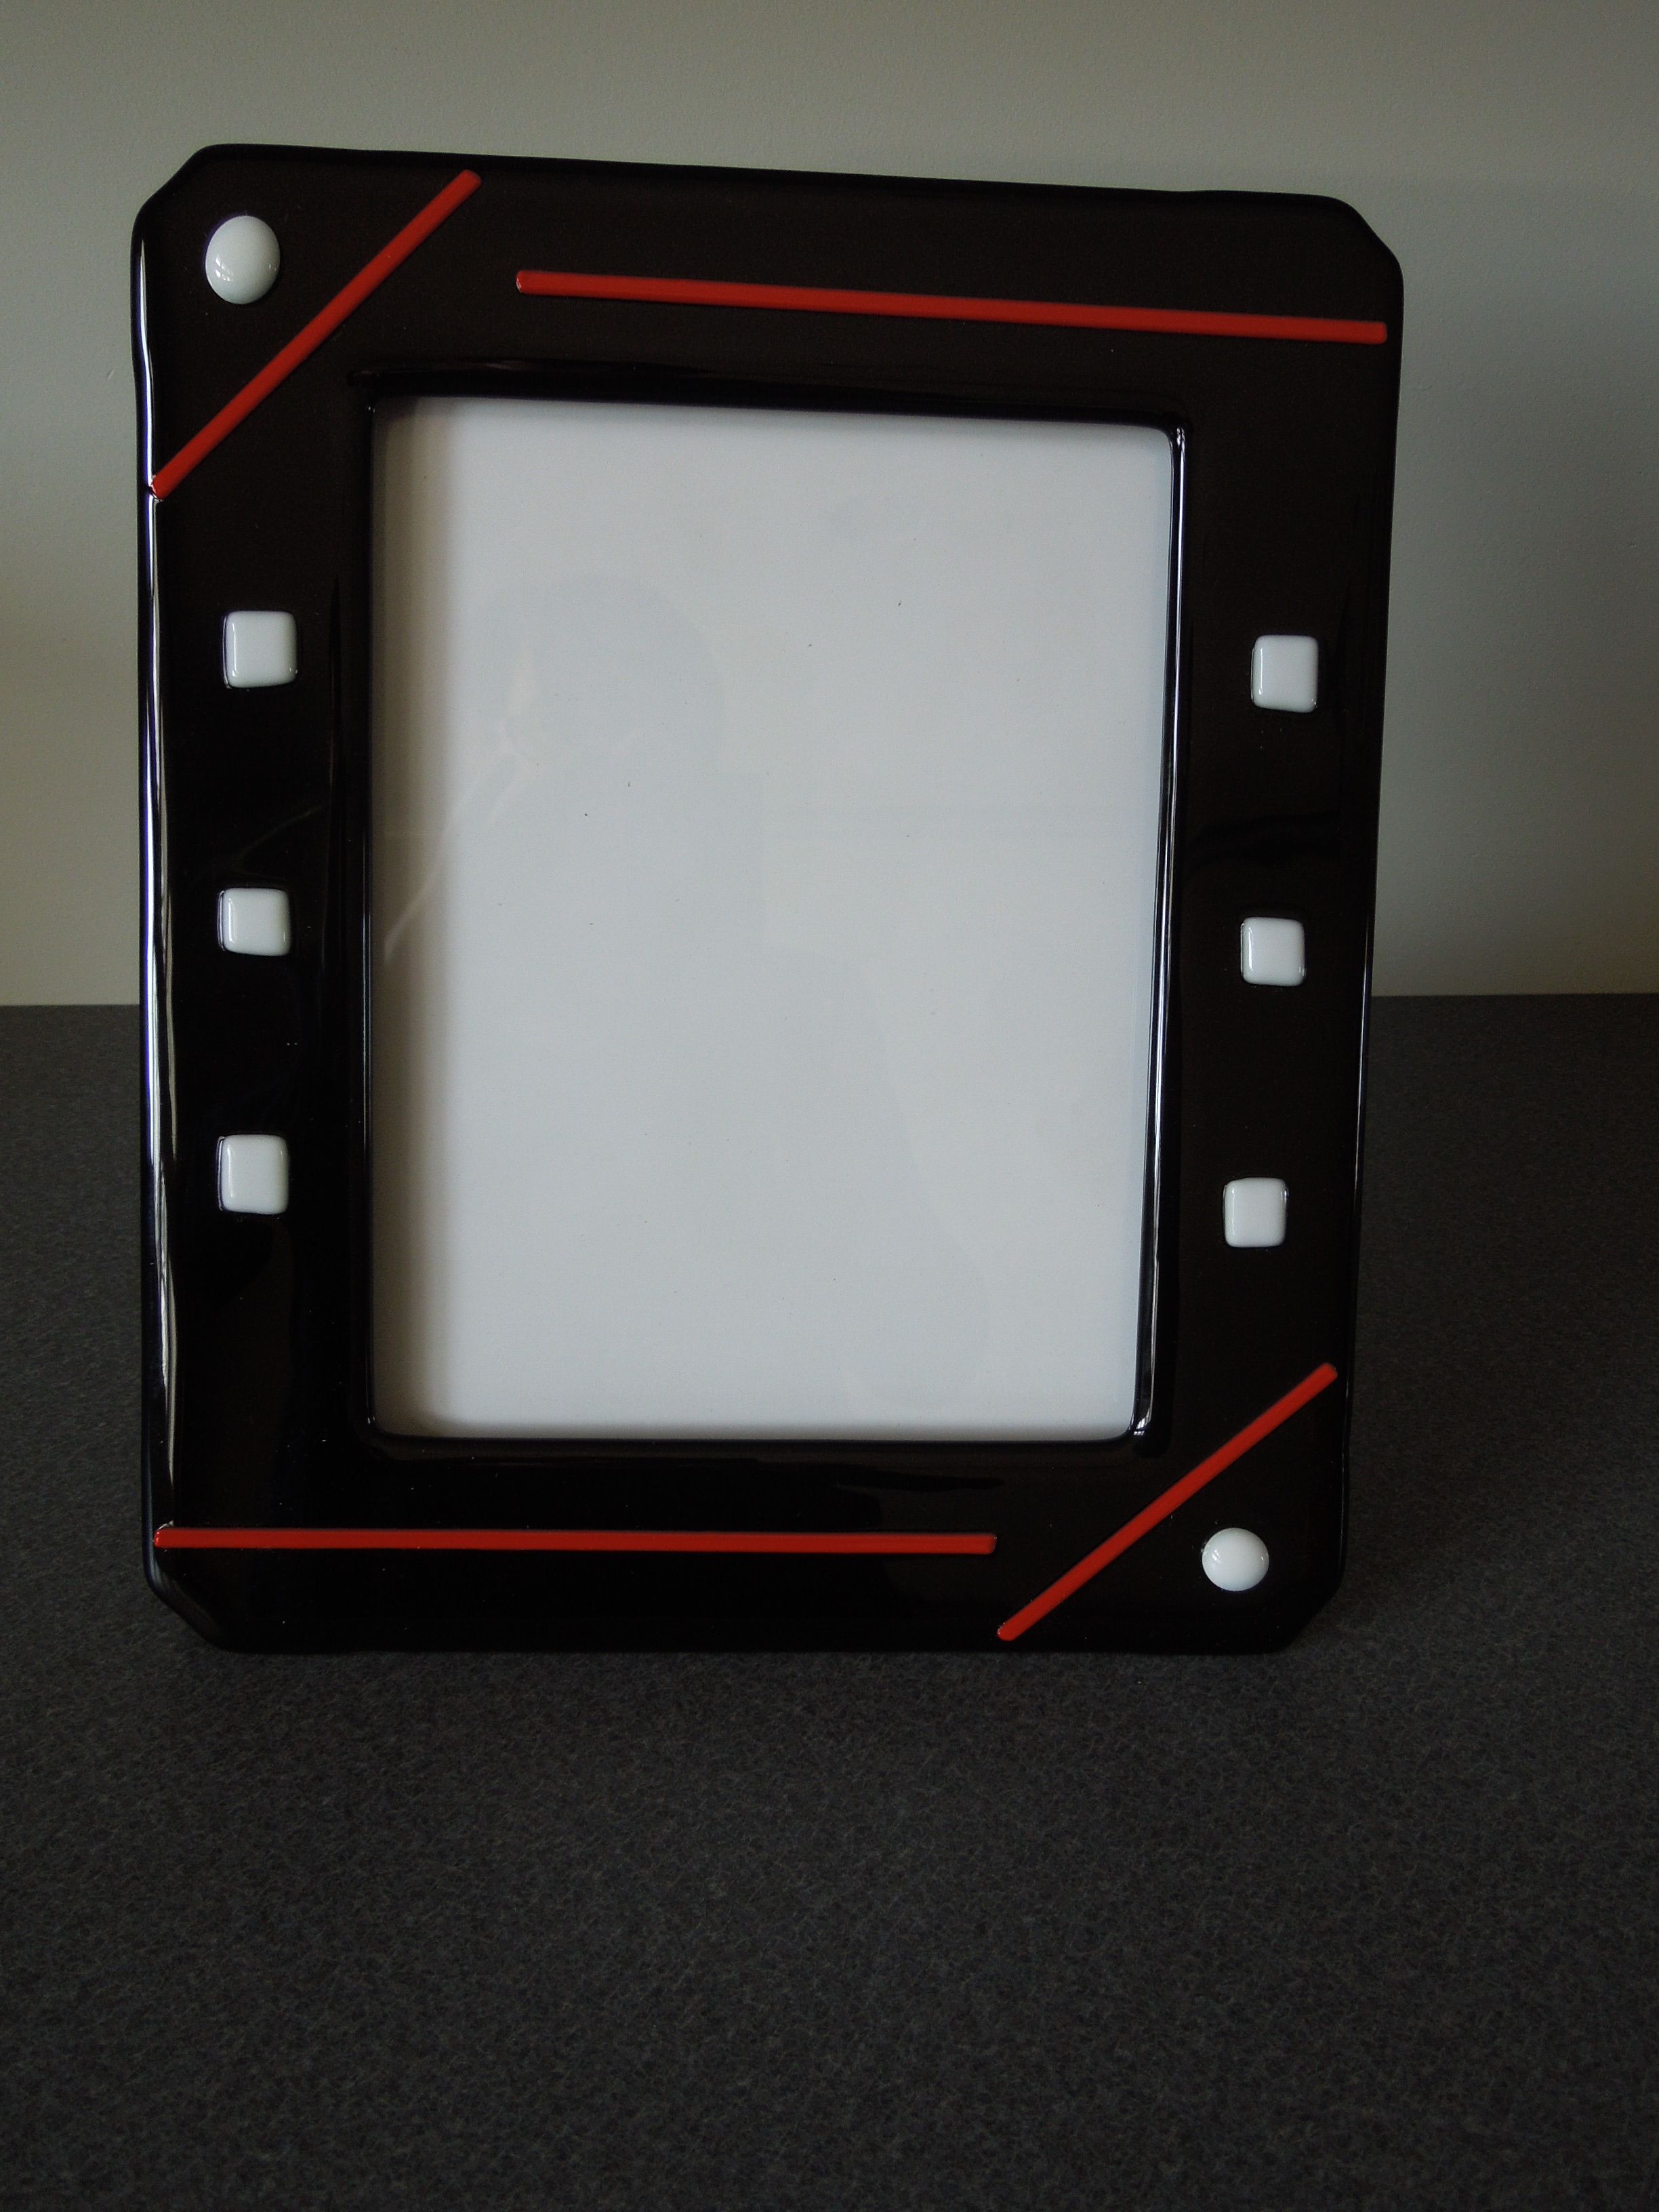
As the finale, here is the frame I made to hold my father’s picture. It is a black 8″x10″ frame with the geometric glass highlights tack fused on for interest. Note that I rounded the corners since the frame barely could fit in my kiln (13″ diameter shelf).
I’m so glad I figured out how to make these glass picture frames. My mind is racing with more project ideas. Time to go back into the studio!
A new take on your Grandma’s paperweight
Remember those heavy, Venetian glass paperweights with little glass flowers trapped inside sitting on lacy doilies? They seem to be a fixture in our grandparents’ or even great-grandparents’ homes. I saw a reference to using a fused glass casting method to recreate this style and I had to try it.
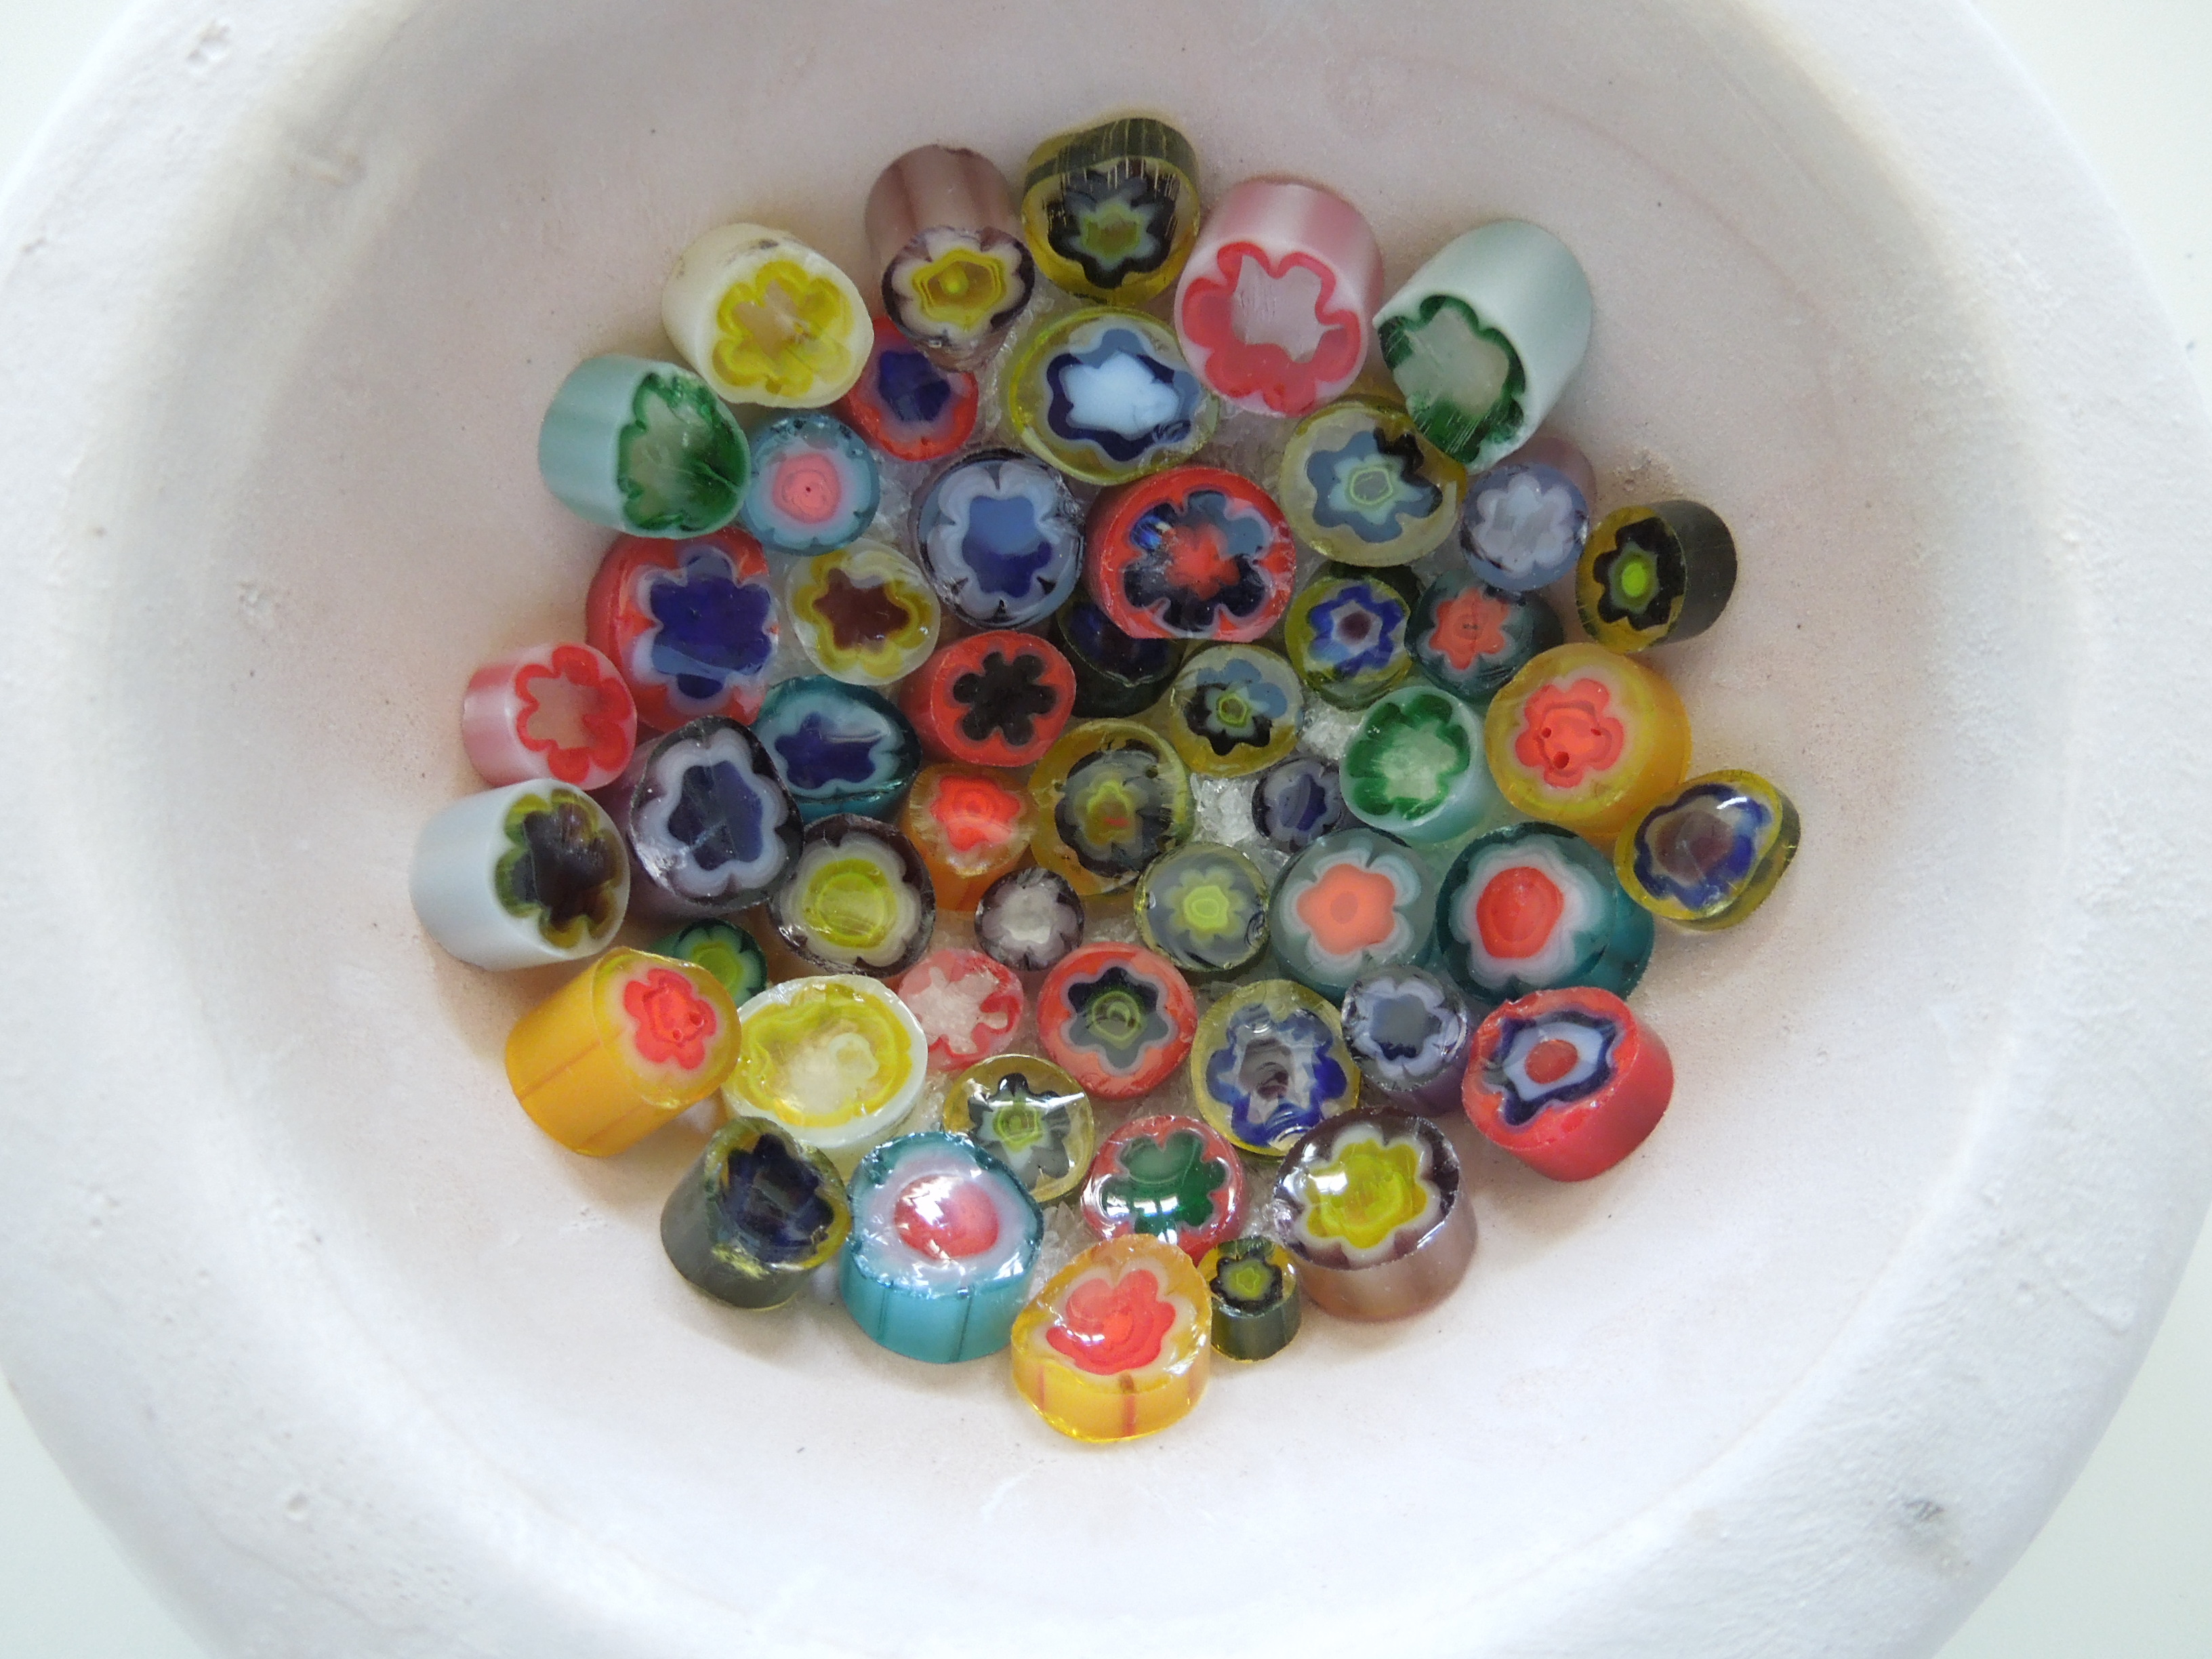
First off – I had to buy a ceramic casting mold (a bowl to create the dome shape) and some glass millefiori. The millefiori manufacturing process is fascinating and I highly recommend looking for a YouTube video illustrating it (but more on that another time). As usual with fused glass molds, be sure to apply multiple coats of kiln wash before filling the mold with glass.
Now begin to fill the mold with glass. I started with a thin layer of clear glass frit.

Then I began to lay out a random assortment of multi-colored millefiori. I wanted a single layer that would dominate the final paperweight.
Another light sprinkle of clear frit to fill in some of the gaps…

and I moved on to filling the entire cavity with pieces of clear glass, often called cullet. The glass should be larger than typical frit. All those random extra pieces of clear glass you had from previous projects? Put some in a paper bag and wail away with a hammer. Besides relieving any frustration you may have, it’s a great way to recycle your glass and create cullet. The more well behaved/well-controlled artist may choose to use glass snips to create small pieces instead.
Whatever your temperament, pile this glass into the mold until it extends an inch or so above the rim.

This goes into your glass kiln, propped up on stilts to allow for better airflow. Treat this cycle like you would for a full fuse, although you will want to hold at your max temperature longer than normal to make sure all the glass has melted – a full cast process. I went to 1460F and held for 30 min. Follow your normal full fuse cooling cycle. Allow the fused glass to sit in the mold for a day after the fusing process! This is a very thick piece of glass and you don’t want to accidentally thermally shock or stress it. (I have not had a problem but this warning seems to be everywhere on the internet and we always believe what we read on the internet right?)
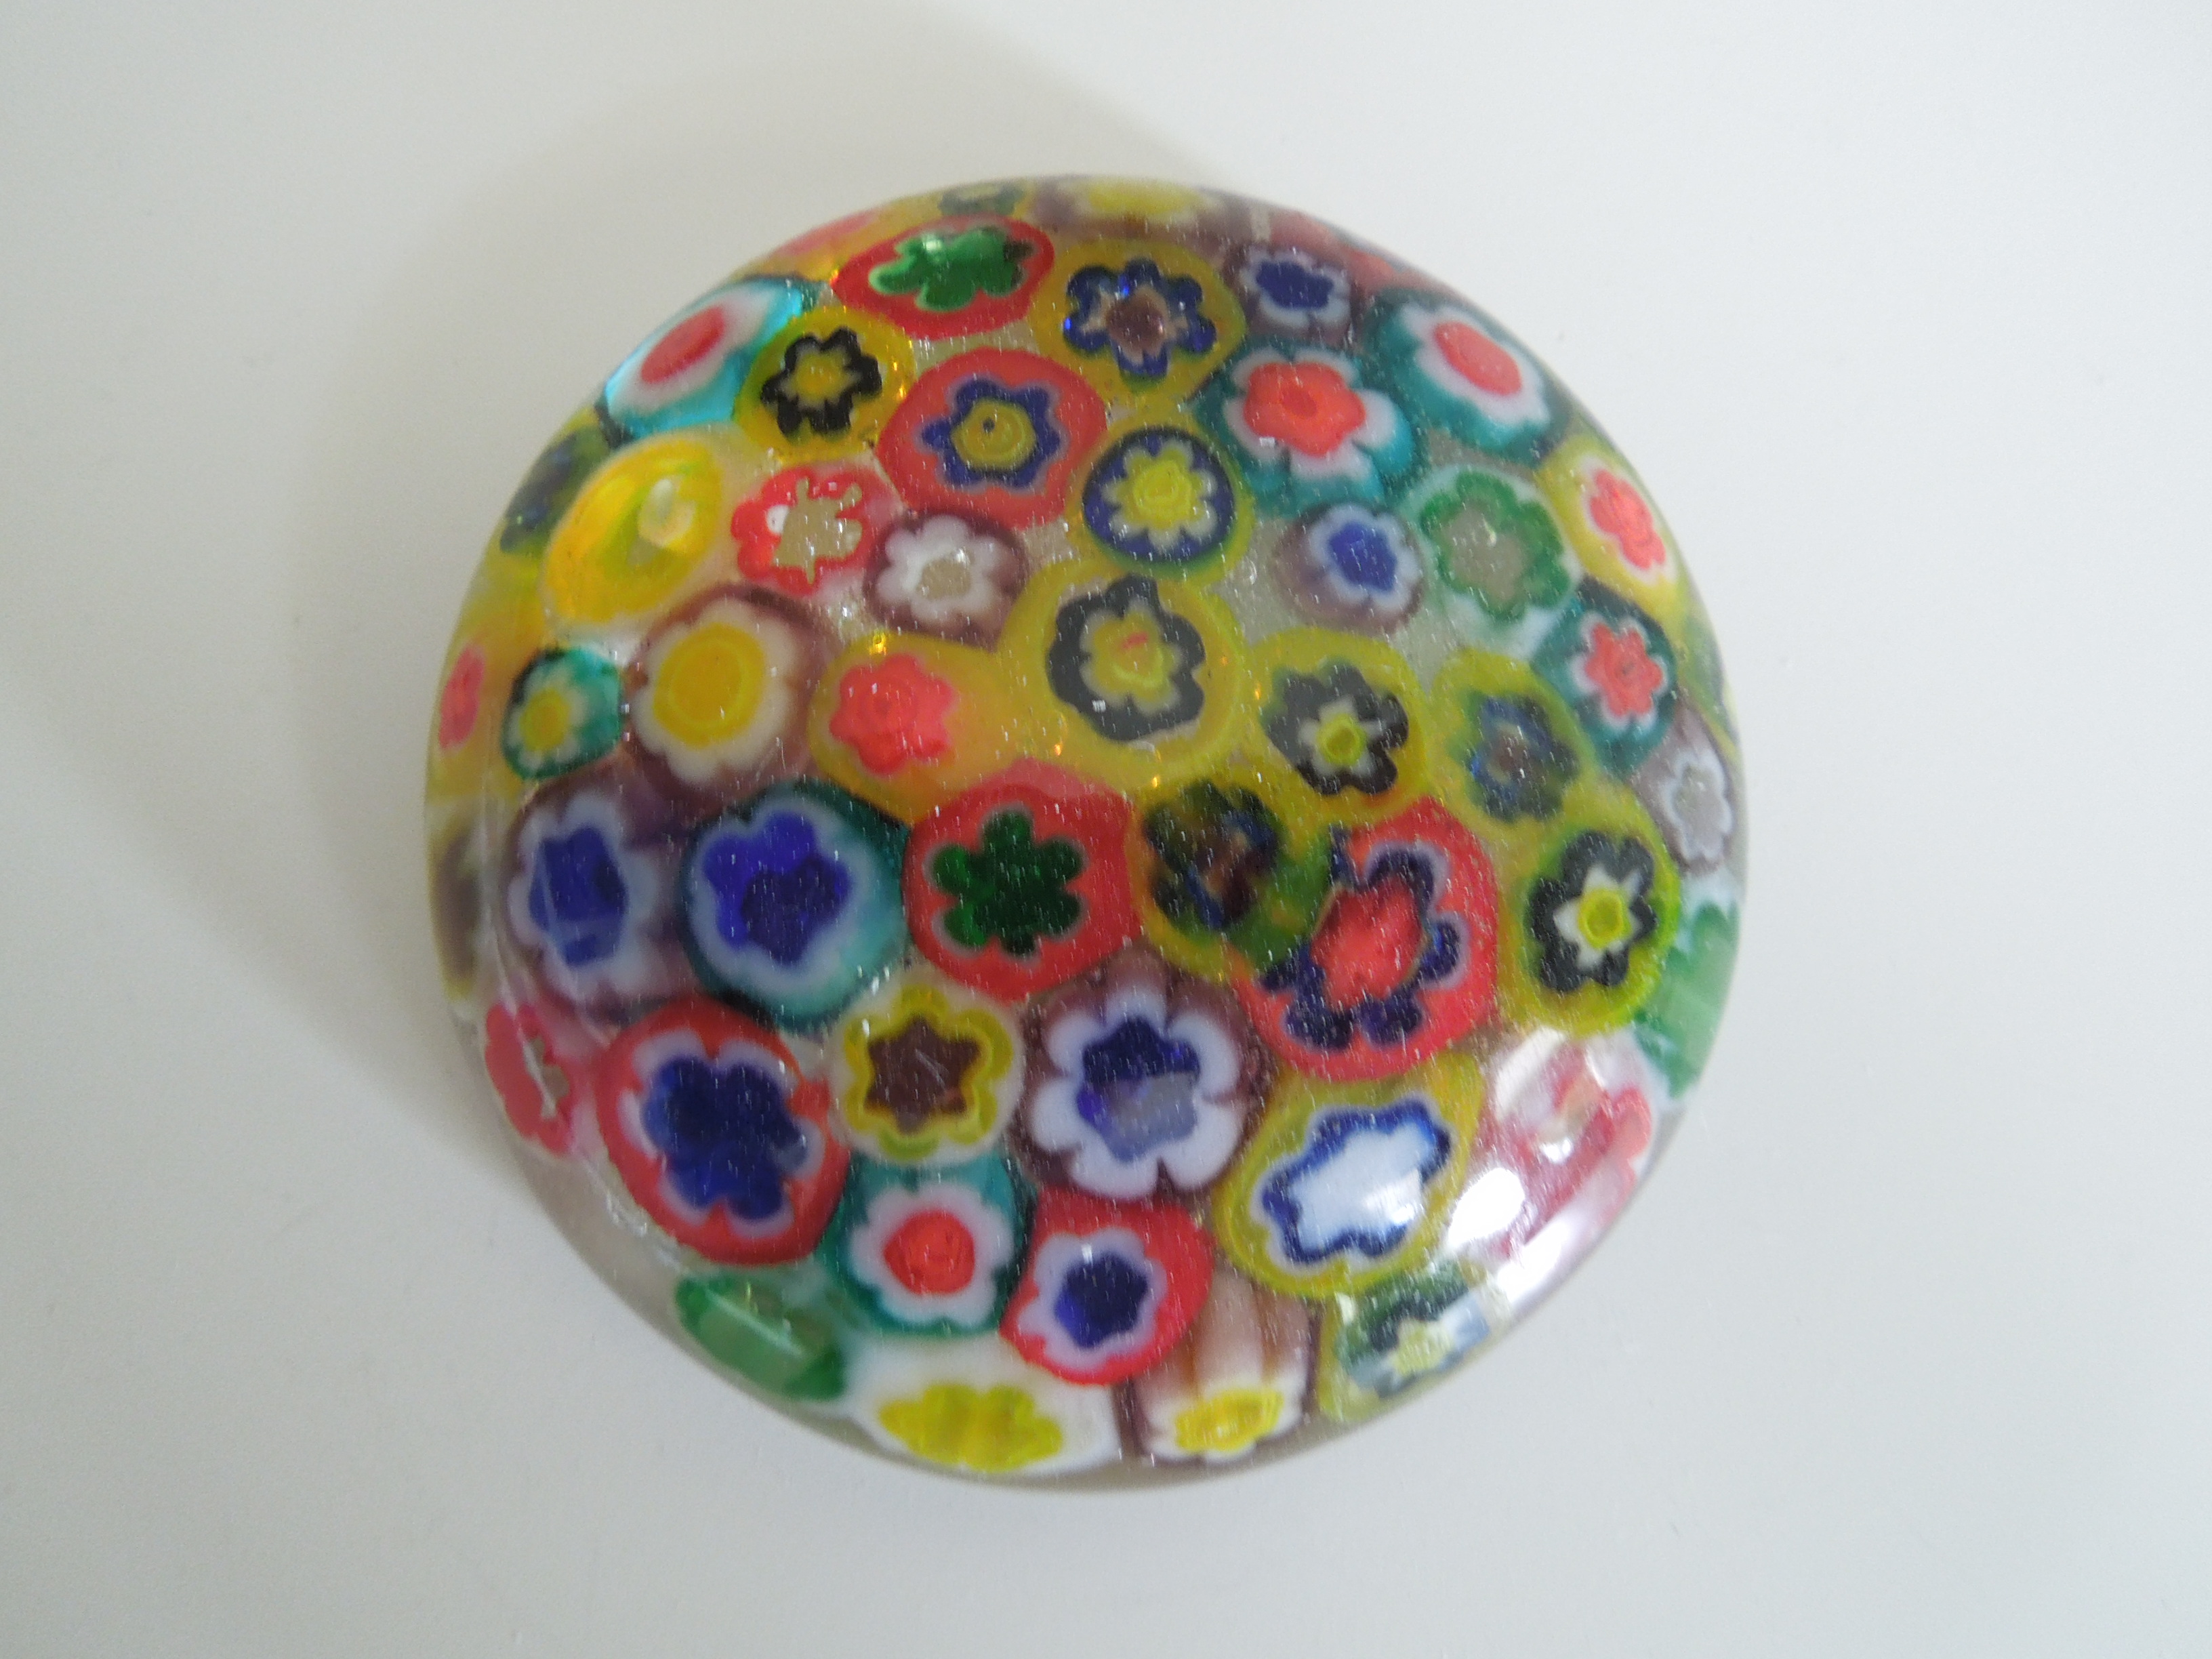
When the mold and glass has cooled, just flip the mold over and out pops a domed paperweight. The bottom may have a few sharp bits which are easily ground off. I thought I was done at this point and I probably could’ve been.
But damn my inquisitive nature, all the warnings on the internet said I needed to fire polish and further anneal my glass to prevent disaster later on. It’s only time and the electrical bill right? So I popped my paperweight back into the kiln. It sat on kiln paper without any mold to force the glass to behave itself.
Since this is really thick glass, more than 1.5″ at height of dome, I ramped up to 1350F at the slow rate of 200F/hour. I then held it for 5 minutes followed by a quick cool to 900F. What’s a quick cool – it’s the infamous AFAP (as fast as possible). Stop the heating elements and open the kiln door briefly several times until the temp gets to ~1200F. Continue to let it cool without added heat until 900F. Then the mother of all anneals should occur – hold it at 900F for 4 hours before shutting the kiln down. Obviously, you have to wait until things get below 200F to open the kiln back up, see the results, and pull out the finished paperweight.
I will admit to being nervous about putting my beautiful ball of glass back in for this fire polish and anneal. What if everything melted and I ended up with a thin round plate? That would have definitely happened if I had held it at high temperature long enough. In my case, the glass dome did smoosh down a little bit and the overall diameter increased slightly. But it was shiny and brought a smile to my face.
I’ve already got 2 more paperweights in process playing with color designs other than using millefiori. Stay tuned to see how those turn out


