Fused Glass Artistry

Welcome to Geek Girl Glass!

Join me on this journey exploring the artistic possibilities of fusing glass. My major objective is to share my creations with friends, family, and the world in an online portfolio. I also will document my successes (and some failures) as I expand my glass fusing technical repertoire. Let's jump in and explore the Hot world of Glass!

Latest

Framed!

To remember my father, I wanted to preserve a picture of him in a special picture frame.  Purchasing a mass produced frame was not going to do him justice.  So began my fun journey into making unique fused glass picture frames.  In fact, I had so much fun and bursts of creativity that I made a number of frames over a 2 week period.  Some of these have already been given as gifts, sold on my Etsy site, and preserved for my own use.  I want to share my technique and a few of my pieces here.

First decision – what size picture are you framing?  Most of my frames are designed for 4″x6″ pictures but I could just fit a frame for an 8″x10″ into my kiln.

Second decision – what basic color do you want your frame to be?  Choose opaque glass for the base frame since you will be gluing a traditional frame on the back.

Now, time to start cutting the glass.  Use of a ruler is a must since you’ll want everything to actually fit together well.  For a 4″x6″ frame, you will need:  4 rectangles 5″x 1.5″ and 4 rectangles 6.5″x1.5″  For an 8″x10″ frame, go with 4 10″x1.75″ and 4 12″x1.75″ rectangles.  If you’re doing your math and laying this out you might be wondering why so many pieces.  The secret is you need to double up the glass when fusing to get it thick enough and allow any seams to be fused away.

Lay the first layer out like so:


DSCN2501
Then lay out the second layer but stagger the pieces differently so the seams on the top and bottom layer don’t line up.  This will allow all the pieces to fuse together into a single frame of glass.  Here is what a basic frame looks like after a standard full fuse (to 1460 F for 3 min).

DSCN2503

Pretty boring yes?  But it’s a great starting platform for decoration and additional fusing.

It is also possible to add more features during the initial frame fusing step.  In this example, I laid out the white frame pieces and then placed millefiori dots in a random pattern on top.

DSCN2499

Here’s the final result:

 DSCN2506DSCN2510

The millefiori completely fused into the white frame creating this fun and whimsical frame.  To complete it, glue a basic frame onto the back.  I buy cheap frames on sale from Michael’s and use E600 glue to bond the frame to the glass.

Now I’m having fun!

Next project took the basic white fused glass frame and aligned multi-color stringers of glass across it.  Note that I use a little elmer’s glue to tack the glass rods in place.  A full fuse (the second fuse of the project) melded all the lines into stripes.

DSCN2505 DSCN2517

When adding decorative pieces of glass to the base frame, you do not have to do a full fuse.  Tack fusing (don’t ramp to such a high temp – go to ~1375 F) will add topography to highlight the decorations.

In this next example, I created the white frame and millefiori trios during a full fuse.  Then, I followed up by tack fusing some green and pink stringers along with blue diamonds.

DSCN2524

Are you starting to get the sense that the sky’s the limit for embellishing the frames?

As the finale, here is the frame I made to hold my father’s picture.  It is a black 8″x10″ frame with the geometric glass highlights tack fused on for interest.  Note that I rounded the corners since the frame barely could fit in my kiln (13″ diameter shelf).

DSCN2512

I’m so glad I figured out how to make these glass picture frames.  My mind is racing with more project ideas.  Time to go back into the studio!

Adding a Little Glitter to Life

Just a quick post to share one of my new favorite pieces.  I wanted to step up the content and interest level of my vases so I pieced together multiple glass components, fully fused them, and then draped them to form this glittery vase.

DSCN2528

Yes, I used some iridescent blue glass along with my more traditional black and white opaques.  The blue and purple colors are actually the same glass.  One side has a thin metallic layer sputtered onto the surface of transparent blue glass (don’t ask me to explain sputtering – that’s actually a key process in my day job and I can wax eloquent for days).  I cut squares and other shapes from this iridescent blue glass and then fused some ‘face up’ and some ‘face down’ so the metal layer exposure varied.  When the metal layer faces ‘up’ it creates that glittery, metallic purple sheen.  Pretty snazzy!

Here’s another viewpoint of the vase.

DSCN2531

When I did my first flat full fuse, I really focused on creating a geometric shape.  It was very satisfying and somewhat lucky that the second slump fuse allowed the melting glass to drape along the pattern.

I had to share these pics since I’m not ready to part with this particular vase and put it up for sale.  It gets a shelf in my house for now.

Chemistry in action – Use of Reactive Red Glass

How could I resist?  The web sales sites offered what looked like ordinary clear or white opaque glass but promised surprising colors after fusing.  Yes, I was lured into the world of reactive glass.

Example of fused glass plate using Reactive Red

Example of fused glass plate using Reactive Red

The concept is simple, when 2 dissimilar but specific chemicals come into contact at extreme temperatures, a reaction occurs which results in a new color in the fused glass.  So what’s the key to this reaction?  There are several chemical combos as well as differing degrees of reaction.  In many cases, sulfur or selenium will react with copper or lead.   ‘Aha!’  you exclaim – that must mean I need to use some green or blue glass.  This is true since copper often is what gives the green and blue hues (but not always).  Glass labelled as teal, cyan, or turquiose are pretty good bets to have lots of copper.  Although the element itself is yellow, sulfur contributes to many red and pink glasses.

But wait.  I’ve been fusing with lots of blue glasses and haven’t seen unexpected new colors in my finished product.  The key is to have the neighboring glass in the fusing process have lots of a reactive chemical such as selenium.  Most glasses in my inventory (or in general) will not have high enough levels to cause a reaction.  This is where glass manufacturers such as System 96 or Bullseye step in to entice the glass artist.

‘Red reactive’ glass is sold in transparent and opaque sheets, stringers, and frit.  When fired in contact with certain glasses (with high copper content), a red color results.  Manufacturers publish recommended glass types for use with their red reactive product.  Copper or silver foil can also be used.

Too good to be true?  Maybe.  There is a hidden catch in all this chemical magic.  The reaction only occurs at the interface between the 2 glass types.  This means your piece will not turn red everywhere.  For maximum effect, you need to maximize the interface.  Understanding this, I focused on using blue stringers and frit fused onto opaque reactive red glass (which looks white).

Here is a close up of my first experiment:

DSCN1925

Notice the red outline around feature.  This is the red reaction.  It really looks like the glass frit had a small explosion leaving a burn mark around each one.

I would be hard pressed to call this piece red.  It is a neat effect but really subtle.  Understanding and embracing this, I created a set of coasters as well as the plate shown at the beginning of this post.

My firecracker coasters

My firecracker coasters

I will continue to play with reactive glass but I’m not sold on its expense.  Feeling underwhelmed, I wonder if I should have titled this post – Barely Getting a Reaction?

Happy Halloween!

Halloween has always been one of my favorite holidays. A bit of goth and gore warms my normally cold, dark heart. In a twist, I am celebrating the season by creating some ‘classic’ images instead of pure geometrical and modern fused glass.

Wavy bowl featuring the best of Halloween - Ghosts, Pumpkins, and a Giant Spider

Wavy bowl featuring the best of Halloween – Ghosts, Pumpkins, and a Giant Spider


I also embraced tack fusing. Each element rises above the base in topographic glory. In this scenic piece, glittery bats fly across a full moon. Can you hear howling in the distance?
DSCN2373
Of course, the season lasts more than 1 evening. I created this pumpkin plate with the intention of using it throughout fall and even for Thanksgiving.
DSCN2367

Regards – My signature skull

Place a candle behind for an eerie effect

Place a candle behind for an eerie effect

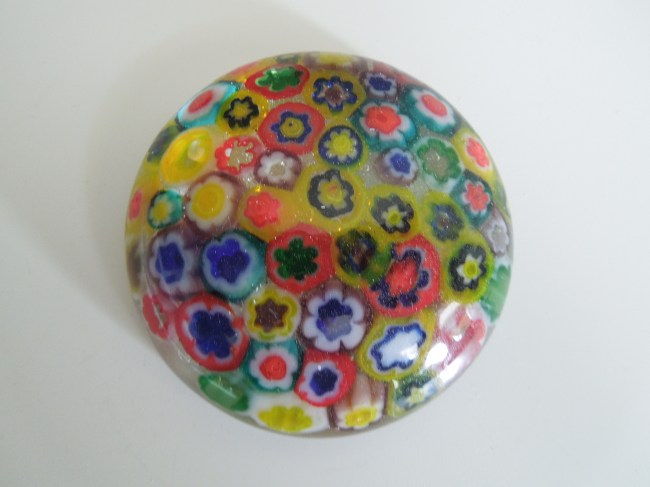
A new take on your Grandma’s paperweight

Image

Remember those heavy, Venetian glass paperweights with little glass flowers trapped inside sitting on lacy doilies? They seem to be a fixture in our grandparents’ or even great-grandparents’ homes.  I saw a reference to using a fused glass casting method to recreate this style and I had to try it.

First off – I had to buy a ceramic casting mold (a bowl to create the dome shape) and some glass millefiori.  The millefiori manufacturing process is fascinating and I highly recommend looking for a YouTube video illustrating it (but more on that another time).  As usual with fused glass molds, be sure to apply multiple coats of kiln wash before filling the mold with glass.

Now begin to fill the mold with glass.  I started with a thin layer of clear glass frit.

Image

Then I began to lay out a random assortment of multi-colored millefiori.  I wanted a single layer that would dominate the final paperweight.

Image

Another light sprinkle of clear frit to fill in some of the gaps…

Image

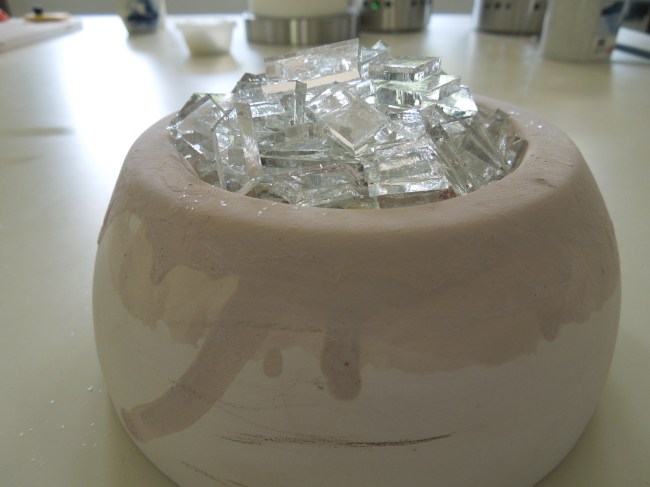
and I moved on to filling the entire cavity with pieces of clear glass, often called cullet.  The glass should be larger than typical frit.  All those random extra pieces of clear glass you had from previous projects?  Put some in a paper bag and wail away with a hammer.  Besides relieving any frustration you may have, it’s a great way to recycle your glass and create cullet.  The more well behaved/well-controlled artist may choose to use glass snips to create small pieces instead.

Whatever your temperament, pile this glass into the mold until it extends an inch or so above the rim.

Image

This goes into your glass kiln, propped up on stilts to allow for better airflow.  Treat this cycle like you would for a full fuse, although you will want to hold at your max temperature longer than normal to make sure all the glass has melted – a full cast process.  I went to 1460F and held for 30 min.  Follow your normal full fuse cooling cycle.  Allow the fused glass to sit in the mold for a day after the fusing process!  This is a very thick piece of glass and you don’t want to accidentally thermally shock or stress it.  (I have not had a problem but this warning seems to be everywhere on the internet and we always believe what we read on the internet right?)

When the mold and glass has cooled, just flip the mold over and out pops a domed paperweight.  The bottom may have a few sharp bits which are easily ground off.  I thought I was done at this point and I probably could’ve been.

But damn my inquisitive nature, all the warnings on the internet said I needed to fire polish and further anneal my glass to prevent disaster later on.  It’s only time and the electrical bill right?  So I popped my paperweight back into the kiln.  It sat on kiln paper without any mold to force the glass to behave itself.

Since this is really thick glass, more than 1.5″ at height of dome, I ramped up to 1350F at the slow rate of 200F/hour.  I then held it for 5 minutes followed by a quick cool to 900F.  What’s a quick cool – it’s the infamous AFAP (as fast as possible).  Stop the heating elements and open the kiln door briefly several times until the temp gets to ~1200F.  Continue to let it cool without added heat until 900F.  Then the mother of all anneals should occur – hold it at 900F for 4 hours before shutting the kiln down.  Obviously, you have to wait until things get below 200F to open the kiln back up, see the results, and pull out the finished paperweight. 

I will admit to being nervous about putting my beautiful ball of glass back in for this fire polish and anneal.  What if everything melted and I ended up with a thin round plate?  That would have definitely happened if I had held it at high temperature long enough.  In my case, the glass dome did smoosh down a little bit and the overall diameter increased slightly.  But it was shiny and brought a smile to my face.

I’ve already got 2 more paperweights in process playing with color designs other than using millefiori.  Stay tuned to see how those turn out

Dropping out

Every once in awhile you want to run away, escape the confines of daily life, and let fate rule.  In other words, it’s time to drop out.Image

Fig 1.  My first 3 Drop Out Vases

In this instance, I was ready to try a new technique in glass fusing.  I wanted to make a different kind of vase, other than a draped handkerchief style.  I had seen pictures of cool vases that looked thinner with truly cylindrical walls but didn’t know how to make them.  So began my intro to dropped vases.

With a dropped vase, you start with a thick flat sheet of glass and suspend it over a ceramic ring (circular or square) that has a hole in the middle.  (The ring needs to be on stilts above the kiln shelf)  Heat the glass up in the kiln to around 1330F.  The center of the glass will slowly drop down through the ring.  This creates the basic vase form. 

Now for some details…

The general rule of thumb is that every 3 mm of glass can drop ~2 inches.  Knowing this, my first attempt used 2 layers of 3mm glass.  Base layer was a 8″ clear plate.  The top layer was a mix of blue and purple segments along with some grape frit to fill in any gaps.Image

Fig 2.  Glass segments laid out before full fuse.

I did a standard full fuse sequence (to 1460 F) to fuse this into one thick glass plate.

Now I was ready for the drop out phase.  I propped the 8″ glass disc on my ceramic ring with a 4″ center hole.  Since my glass was 6 mm thick, I theoretically could allow for a 4″ drop.  However, I was very nervous and opted to only use 3″ posts.  I was afraid my glass would drop too much, thin too much, and actually collapse or open a hole in the center.

Image

Fig 3.  Set up in kiln before drop fuse cycle.

For my first attempt, I only went to 1300F and held for 15 minutes.  I was peeking into the kiln quite a bit.  I discovered it was really hard to tell how far down the glass was drooping.  Was it hitting the kiln shelf?  Once you think it’s dropped enough, you need to drop the temp as fast as possible to an annealing temp of ~950F.  If you hold at high temps, the glass will continue to melt and let gravity do its thing.  To speed the cooling, I opened the kiln top several times until the temp was down to around 1100F.  I did find out that even Kevlar gloves will start to singe if you hold them near the kiln opening too long!  A bit too toasty for my comfort.

Image

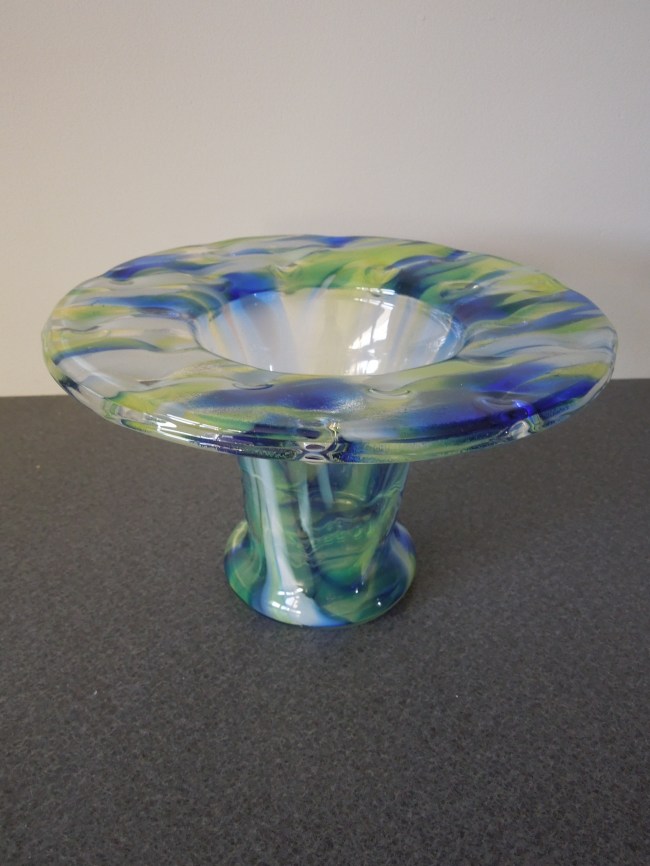
Fig 4.  The final product placed in an iron stand.

Once everything was cool, I was able to see that I freaked out too soon.  The glass had dropped but not enough to really hit the kiln shelf and form a flat base.  That’s ok.  I had a nifty iron candle stand I pressed into service.  You will also note that the vase lip is rather wide and has dimples.  To support the weight of the dropping glass, the lip on all molds will tend to be wide.  My particular mold had small holes throughout the lip to add additional dimension (or dimples).

That was fun!  Let’s try again. 

Round 2 featured 3 layers of fully fused glass.  This thicker starting point was a boost to my confidence that the drooping glass had enough material to drop to the kiln shelf.  I used 3″ posts again but went a little hotter, to 1330 F, and held longer, for 20 minutes.

Image

Fig 5.  Much better!  This vase can stand on its own or in a stand (as shown).  It also has enough volume to hold a votive candle.

Now I was ready to really go for it!  Last attempt used 3 layers of glass but I boldly used 4″ posts.  I was going to let this one drop further.

Image

Fig 6.  Finally, a full drop out vase, complete with a foot.

Note that a foot formed by allowing the droop (or slump) to continue beyond the point of initial contact with the kiln shelf.  A little longer and things might have gotten dicey.  Remember, the foot cannot get wider than the ceramic ring’s hole or you can’t pull the glass vase out!

To succeed in dropping out, you do have to let go of your fears and just go for it.  It can be scary but you’ll figure things out.  I’m ready to get even wilder – more layers and larger drops.


Shattered

*!@#%^*!!!!

Yup, that echoed throughout my studio when I checked a kiln run that was ruinous.  I had been lured into a compulsive buy at a glass supply store.  The specialty glass piece had multi-hued green shards on top of a blue swirled opaque white sheet.  I thought it was perfect for one of my organic shaped vases.

During the initial heating process, right around 600 F, I heard a loud noise but didn’t know what it might have been.  I wasn’t about to violate the basic rules of fusing glass and look inside the kiln when it wasn’t above 1100 F.  When the temperature did reach the expected slumping point (~1200 F), I took a peek.  Oh no!

This is what I saw.

DSCN1380DSCN1381

The center of the glass had split open and the entire piece had fallen down around the mold instead of slowly draping over it.  I think the noise I heard was the glass splitting open.  Maybe the glass had not been properly annealed when I obtained it?  I used my standard ramp rate for heating the glass – after holding for 15 min at 300F, ramp to 1100 F at 300 F/hour.

This odd glass imitation of a mounted fish (I could only see a big bass mouth mocking me) stumped me for many months.  What would I do with it?

Hammer time!

Yes.  I attacked this with a hammer and smashed this oddity into pieces.  I could start over.

I choose to tack fuse some of these shards onto an opaque white sheet.  DSCN1697Now it was time to try to drape this over a floral former to create a vase.

DSCN1706

Success!!!! I’m happy with how I recovered from one fusing disaster to create something exciting.  Perseverance pays.

Less is More – Downsizing a Vase

We’ve been taught to believe that bigger is better.  When presented with a draping mold, I always made full use of it.  A mold that stands 7″ high should produce a vase that also stands 7″ high.  But of course!  In fact, I’ve been apologetic that I couldn’t produce larger, more glorious vases due to the size of my kiln.

Imagine my surprise when I got an inquiry about miniature bud vases.  What exactly did they want?  A tall but narrow vase?  A short vase?  And more importantly, what could I actually make?  I had never considered my options.

Let’s start with the draping molds or so-called floral drapers I had access to.

Floral drapers

On the right is a mold which stands 7″ tall with a top (the final vase base) that is 2.5″ in diameter.  On the left, is a stainless steel pillar also 7″ tall but with a narrower 1″ diameter.  Both have been coated with boron nitride (MR-97) which is a glass mold release and makes the shiny stainless look white.

All my previous vases started with a 12″ sheet of glass that would drape around the mold at elevated temperatures and produce a 7″ tall vase.  (See my previous post https://geekgirlglass.com/2013/10/19/feeling-the-heat-temperature-dependence-of-draping-vases/) .  My obvious first attempt to shrink a vase was to repeat the process but starting with a 8.75″ sheet of glass with rounded edges.  The result was a funky, short fat vase that stood 5″ tall.

DSCN1674

How about using the 1″ diameter floral draper?  I went with a 6″ square of rose colored transparent glass.  (Yes, I kept decreasing my starting glass size).  That ended up with a 4″ vase with a small 1″ base and rosy’ flames’ creating the sides.

Smaller! Smaller!

Next attempt used a 7″ circle draped over the 2.5″ form.  I played with blue frit on the border and confetti glass pieces to create a tribute to Mondrian.  This ended up more like a bowl than a vase.  Total height = 2″.

Fourth variation really pushed the limits.  Only a 4.5″ circle of glass was draped over the 1″ form.  This resulted in a truly petite 2″ tall vase.  Perhaps this is only good for holding a few Jelly-Bellies?

Here is the final line-up of vase variations.

DSCN1683As you can see, I have a much broader range of vase options than I thought.  I had a blast pushing the limits of down-sizing with this project.  In the end, I must agree with Mies Van der Rohe.  Yes, ‘less is more.’

A Plateful of Knowledge

Learning a new craft can be an arduous process with many false starts before success.  Looking at this recent fused glass platter I made

Plate of Knowledge

one would not know the journey I took to get to this point.  Multiple learning ‘opportunities’ went into the creation of this.

The bane of my early fusing existence is now frozen in the center of this platter.  Yes, for months, a flat rectangular blue piece of glass with white steps mocked me.  This was the very first attempt I made to fuse glass in my new kiln.  The intent – tack fuse white rectangles so they held their shape above a vibrant cobalt blue base.   I actually made two pieces and they looked like this after firing:

DSCN0736

Immediate observations – I went to too high a temperature and everything fused into a solid flat piece – no tack fusing.  (Ok, I was learning my kiln’s temperature profile).  Also – you’ll note the edges seem very rough.  This is because I had to basically break the glass off the kiln shelf.  I believed the beginner instruction book that said kiln washing the shelf would be sufficient to prevent glass from sticking.  Ha!  I’ve used shelf paper between my glass and the kiln shelves ever since.  A third observation – the finished glass is very thin.  I should have used 2 layers of 3 mm glass and then added my smaller rectangles.  Glass naturally wants to re-solidify at a certain thickness (~4 mm) and I didn’t provide enough to make the laws of physics happy.

After many months, I decided to revisit my sins and try to make something out of my first fuse attempt.  To make the platter, I used a clear base with an opaque white sheet on top (my 2 layers of 3 mm glass).  I then centered my original blue/white rectangle in the center (3rd layer).  To make a border and add visual interest, I placed 4 strips of cobalt blue near the edges.  My pride with the placement of these blue strips is that they did not cause the outer platter edges to bulge out in any way – another early problem I had when layering smaller components.

Now, every time I look at this platter, I see it as a symbol of what I have learned in these first months glass fusing.  I’m really glad I choose to tackle this demon.

A Scattered Approach to Leftovers – Making the most of scrap glass

It happens to the best of us – the accumulation of little bits of glass.  Too big to throw out but not great enough to make it into an official art piece.  Soon, plastic bins are bulging with these discards.  How to alleviate the guilt?  Make more fused glass!

These scattered glass pieces are some of my favorites and are almost ‘free’ since they are composed entirely of scrap glass.

DSCN1464   Assemble some scraps.  Be sure to include a lot of clear glass.  This example uses opaque glass but it is even better layering transparents.  Freely snip pieces into irregular shapes.

Don’t cut a glass base.  We are going to be creating a piece with holes.

Do have an outline drawn on kiln paper or a general shape in mind as you begin to lay out pieces.  Start on the outside and work towards the center.

DSCN1465

Leave lot of space.  Then add another layer of glass pieces – creating bridges between other pieces.

DSCN1466

Continuing stacking and layering.  Remember to use lots of clear!

In general, it is ideal to have 3 layers of glass in the overall stack.  A few places could have up to 4 pieces but don’t overdo it.


Here’s the final raw piece and what it looks like after a full fuse.

DSCN1467DSCN1474


Now slump into a mold.  This one is a 8″ bowl.  You can also try plates and platters, etc.

DSCN1482Now there is no excuse to throw out glass scraps bigger than 1/2-1″!  The best use of leftovers ever.